 Divisi
How to grow African eggplant
Solanum aethiopicum · Solanaceae
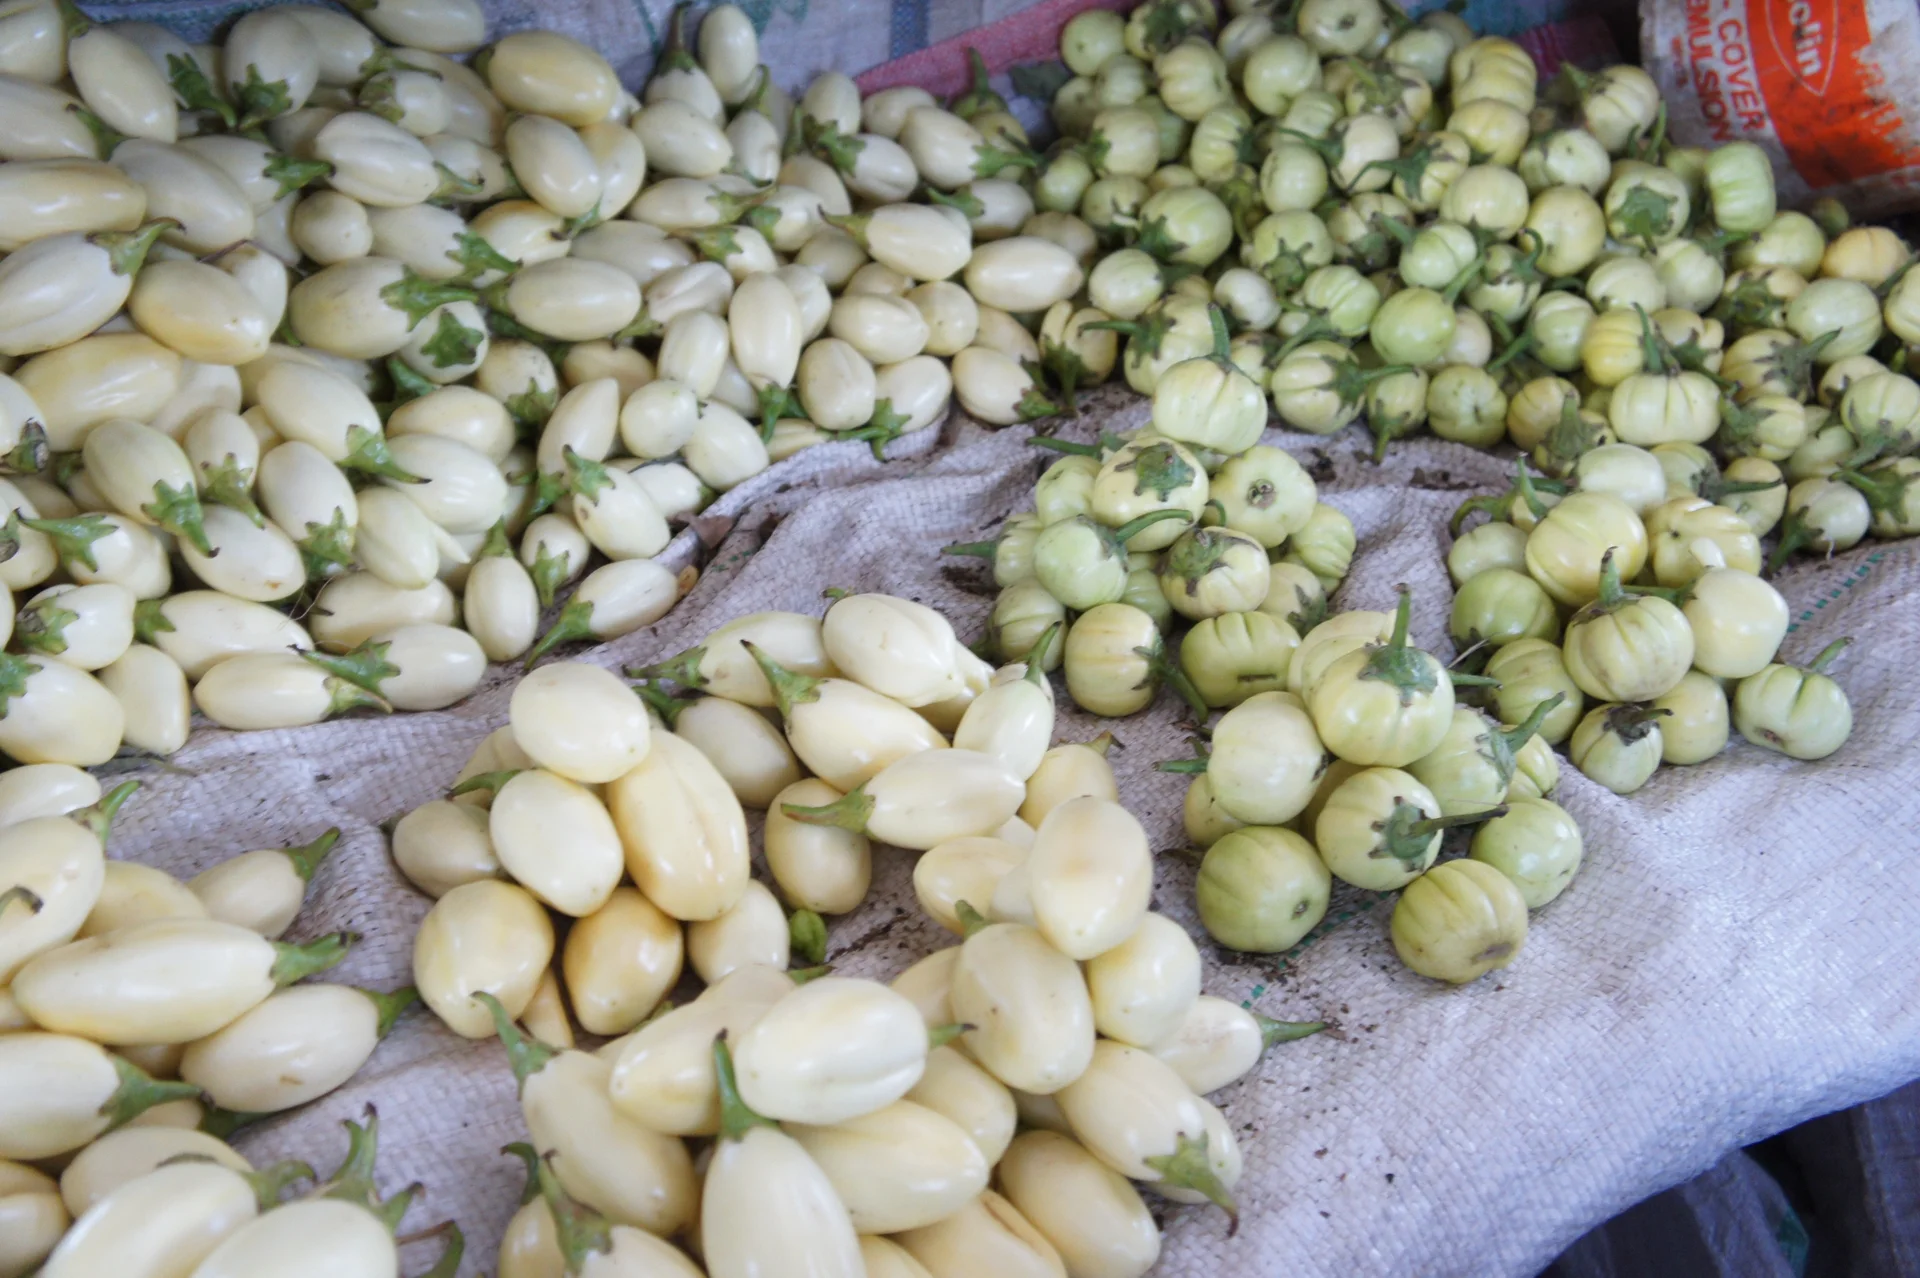
Photo: Michael Hermann · CC BY-SA 3.0
African eggplant (garden egg, bitter tomato, ngogwe, nakati) is a tough, home-grown cousin of tomato and eggplant, grown two ways at once — for its round fruit, which is often pleasantly bitter, and for its soft, tasty leaves. You choose your line at the very start: a fruit type (the Gilo and Kumba groups) for round fruit picked young, or a leaf type (the Shum group, Uganda's nakati) cut again and again like a leafy vegetable. Because it belongs to the same family as tomato, potato and pepper, it shares their worst soil enemy — bacterial wilt, a disease with no cure — so it must never follow those crops on the same land. Given a clean nursery, a well-drained field and steady feeding, one planting keeps giving for months.
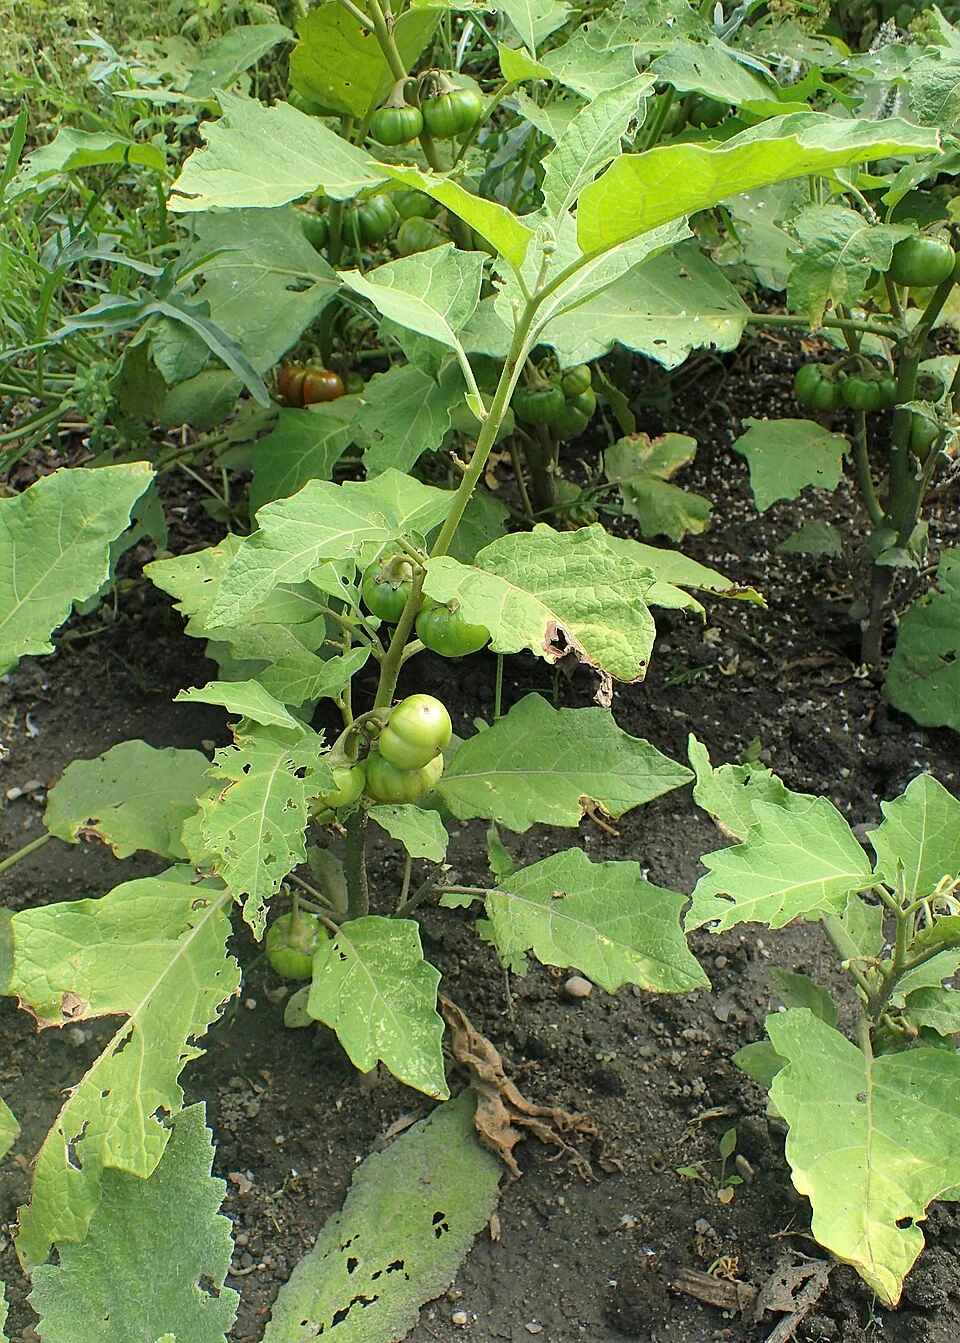
Krzysztof Ziarnek, Kenraiz · CC BY-SA 4.0 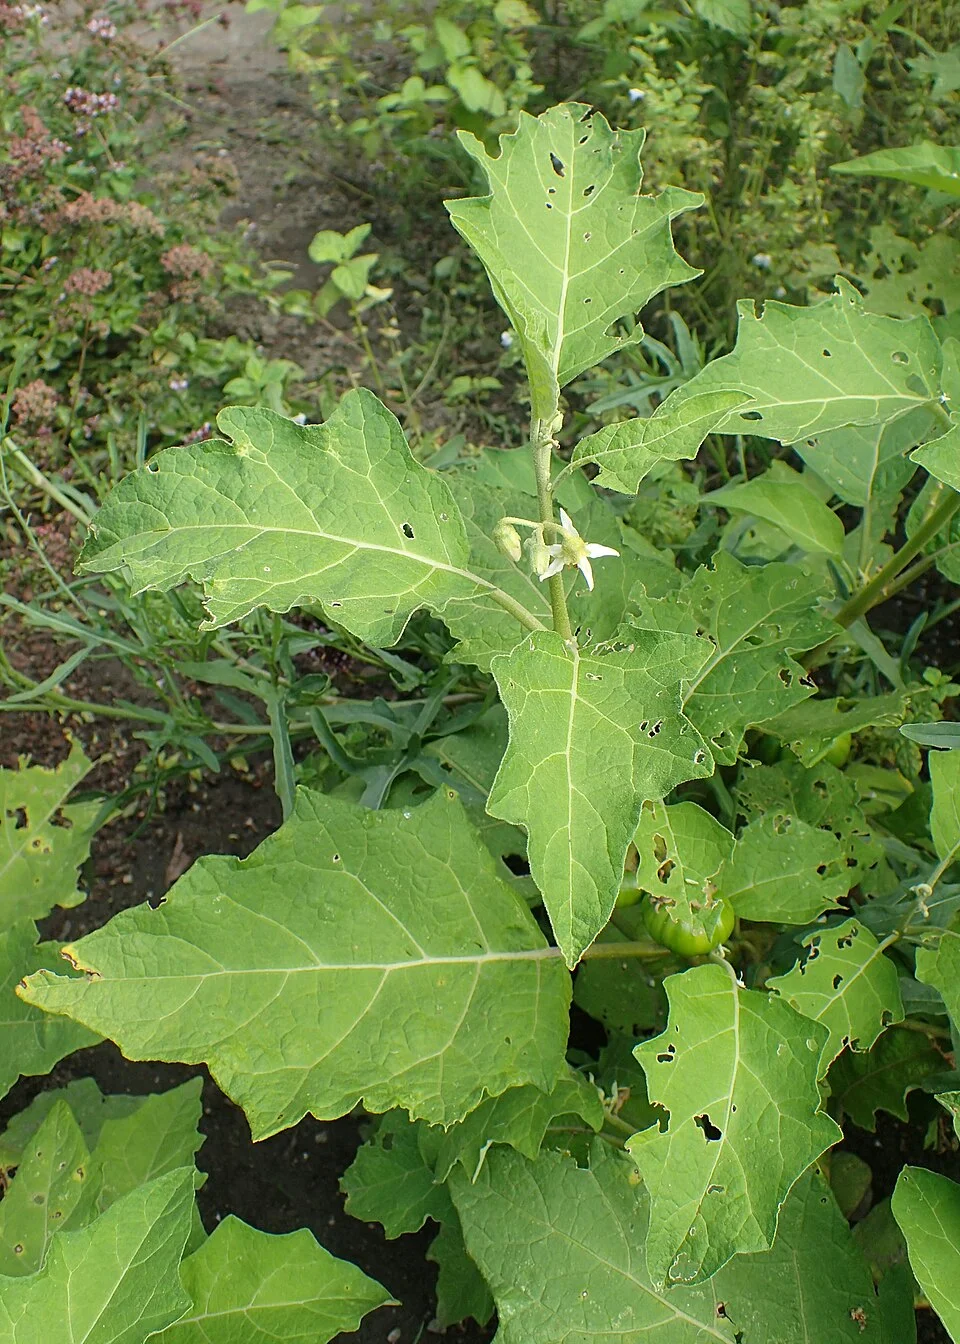
Krzysztof Ziarnek, Kenraiz · CC BY-SA 4.0
- Days to maturity
- 90–125 days
- Row spacing
- 90 cm
- Plant spacing in the row
- 90 cm
- Sowing depth
- 0.5–1 cm
These are general figures for the crop, compiled from published agronomic references including FAO and CABI. The right choice for your field depends on your soil, rainfall and the yield you are aiming for.
Will African eggplant actually do well on your field? Check your own field against every crop in the catalogue — no signup. Run the crop check →
Also known as
African eggplant is also called garden egg, bitter tomato and scarlet eggplant.
- English
- garden egg, bitter tomato, scarlet eggplant
- Akan
- nyaadowa
- French
- aubergine africaine, gilo
- Luganda
- nakati, ntula
- Swahili
- ngogwe
- Yoruba
- igba
Working in buckets, bags or paces? The farming glossary turns the measures growers actually use into kilograms and hectares — what a 20 litre bucket of each crop really weighs, and how to size a field by walking it — alongside the Shona, Swahili, Ndebele and Yoruba words used in the field. Open the glossary →
Growing African eggplant, stage by stage
Your African eggplant season, step by step — raise strong seedlings in a clean nursery, transplant onto land that has had a long break from tomato, potato and pepper, feed and water it steadily, stay ahead of the fruit-and-shoot borer, and pick fruit or cut leaves every few days through a long harvest.
Get ready: pick your type, raise seedlings, plan the land
African eggplant is not sown straight into the field — it starts life in a nursery, where tiny seed is raised into strong seedlings you move out about a month later. Choose a fruit or leaf type and raise clean, healthy seedlings; while they grow, prepare the field in parallel (see Land Prep).
Sow the nursery Critical
The seed is tiny — as small as tomato seed — and a baby seedling cannot fight weeds, sun or heavy rain out in the open. A nursery lets you raise a few strong, even seedlings on a small, well-cared-for patch, so that 30-35 days later you transplant sturdy plants instead of nursing weaklings across a whole field.
Choose your type first, because it changes everything after: a fruit type (Gilo or Kumba groups) for round fruit, or a leaf type (Shum / nakati) for leafy greens. Buy clean seed of that type from a trusted source.
Make a raised nursery bed of fine, clean, well-drained soil, or fill trays — somewhere that will never flood. Water it first so it is damp, not wet.
Sow the seed shallow — barely cover it, no deeper than about 1 cm (a fingernail deep). Sow thinly in little rows; crowded seedlings grow thin and weak and fall to rot.
Keep the bed evenly moist, never waterlogged. Give it shade in fierce heat and good airflow, so the leaves dry off each day.
When seedlings crowd each other, thin them (pull out the weakest) or prick them out (lift and replant them wider apart) to give each one room. Raise them for about 30-35 days, until they have 5-7 leaves and stand a hand-span tall (15-20 cm).
In the last week before moving them, harden them off — toughen them up — by giving a little less water and a little more sun each day, so they don't wilt when they hit the field.
- Do:
Source clean seed of the right group — a fruit type (Gilo/Kumba) or the leaf type (Shum) — and remember which one you sowed; it sets your spacing and how you harvest.
- Tip:
Sowing thickly or over-watering — packed, soggy seedlings are exactly how damping-off (a rot that topples baby seedlings at the soil line) can wipe out a nursery in a night.
- Watch out:
Look for seedlings that suddenly flop over with a thin, dark, water-soaked pinch right at the soil line — that is damping-off. Pull the sick ones, stop over-watering, and let the bed dry out and breathe.
Get ready: plan the rotation, prepare the field
While the nursery grows, get the field ready. Almost everything that protects the whole season is decided now: pick land that has had a long break from tomato, potato and pepper so bacterial wilt can't strike, then work it deep, drained and manured. If you're not raising your own seedlings, buy strong, healthy ones now.
Plan rotation away from Solanaceae Critical
African eggplant shares one deadly soil disease — bacterial wilt — with tomato, potato, pepper and common eggplant. The germs live in the soil for years after an infected crop. Planting onto land that grew any of those recently is the single biggest way farmers lose the whole crop to a disease that has no cure. Choosing clean land now is free insurance.
Well before you transplant — around the time you start the nursery, about 3-6 weeks ahead — decide exactly where the crop will go, not just that you'll grow it.
Pick a plot that has not grown tomato, potato, pepper, eggplant or African eggplant for at least the last 2-3 seasons. The longer the break, the safer you are.
Choose to follow cereals (maize, sorghum, millet) or legumes (beans, groundnuts) instead — they don't carry this wilt, and they leave the soil in good heart for a hungry crop.
Avoid low, wet ground where water sits after rain: bacterial wilt spreads in water and wet soil, so a soggy plot lets it race from plant to plant.
- Do:
Keep a simple note of what grew on each plot last season, so you can always find land with a clean history when it's time to plant.
- Tip:
Following tomato, potato, pepper or eggplant — even 'just this once'. There is no spray that cures bacterial wilt; rotation is your only real protection.
Prepare a deep, well-drained, manured field Recommended
This is a hungry crop that feeds for months, and it hates wet feet. A deep, loose, well-drained bed rich in rotted manure lets roots go down, drains away the standing water that carries wilt, and stores the food a long harvest needs. Land prepared in the 2 weeks before transplanting is ready to receive seedlings the moment they are.
Clear weeds and old crop trash, then dig or plough deep — as deep as you can work it — so roots reach down and rain soaks away instead of pooling.
Work in plenty of well-rotted manure or compost — about a wheelbarrow every few strides across the plot. Well-rotted means dark and crumbly with no strong smell; fresh manure burns young roots.
Manure and wood ash also bring potassium (K), which this crop is hungry for — it builds firm, well-coloured, better-tasting fruit.
On flat or low ground, make raised beds or ridges so water drains away fast. Standing water both rots the roots and spreads bacterial wilt.
Mark out your planting positions at the final spacing — about a stride (90 cm) between rows and a stride (90 cm) between plants for fruit types (set them closer for leaf/Shum crops, which you cut young).
- Do:
Raise beds or ridges on any plot where water is slow to drain — good drainage is a wilt-fighter, not just a rain measure.
- Watch out:
Wash your hands after handling manure, and keep it away from drinking water and from where children play.
Source healthy seedlings Critical
If you're not raising your own, the seedlings you buy are the crop that will pay you back for months — a sick or leggy transplant never fully recovers, and one seedling carrying bacterial wilt can wipe out the whole planting. Buy strong, clean plants of the right type (fruit or leaf) from a trusted nursery in the week before you transplant.
Decide your type first — a fruit type (Gilo/Kumba) or the leaf type (Shum/nakati) — and buy seedlings raised from clean seed of that group.
Pick stocky seedlings, 5-7 leaves and about a hand-span tall (15-20 cm), with a thick stem — not tall, thin or pot-bound ones.
Check each one for wilting, yellowing or spotted leaves and reject the whole batch if many look sick — a bought-in wilt problem can never be cured once it's in your field.
Transplant them within a day or two of buying, and keep them shaded and watered until you do.
- Do:
Confirm which type (fruit or leaf) you're buying — it decides your spacing and how you'll harvest all season.
- Tip:
Buying cheap, leggy or wilting seedlings — you're buying a poor crop and maybe a disease with no cure.
Transplant and get every plant to take
Now you move your seedlings from the safe nursery out into the field. The number of plants that take hold and survive here is the ceiling on your whole harvest. Transplant gently into well-drained, manured soil at the right spacing, water them in at once, and watch closely — this is when bacterial wilt, cutworms and flea beetles do their worst.
Transplant + water in Critical
A seedling's roots are torn a little when you lift it, so the first days in the field decide whether it sails on or sulks and dies. Transplanting in the cool, firming the soil around the roots, and watering in straight away helps every plant take hold — and setting them onto clean, well-drained land keeps wilt out from the very first day.
Transplant your hardened, 30-35-day seedlings (5-7 leaves, a hand-span tall). Water the nursery an hour before lifting, so soil clings to the roots and they come up with a ball of earth.
Work in the cool of the day — early morning, late afternoon, or an overcast day — never in the hot midday sun, which wilts fresh transplants.
Set plants at the marked spacing: about a stride (90 cm) between rows and a stride (90 cm) between plants for fruit types; closer for leaf (Shum) crops.
Plant each seedling to the same depth it sat at in the nursery, firm the soil gently around the roots so there are no air pockets, and water it in at once.
Never plant where tomato, potato, pepper or eggplant grew recently — check the plot's history one last time before you set a single seedling.
- Do:
Confirm one last time that the site has not grown tomato, potato, pepper or eggplant recently — this is the decision you can't undo once plants are in.
- Do:
Transplant late in the day and water in — the cool night lets the roots settle before the next hot sun.
- Tip:
Letting the roots dry out between nursery and field — carry seedlings shaded and moist, and plant them the same day you lift them.
Scout (cutworms, flea beetles, wilt) Critical
The first two weeks are when young transplants die fastest — cutworms can fell them overnight, flea beetles can shred their leaves, and bacterial wilt can begin its silent spread. Ten minutes walking the crop twice a week lets you catch and stop trouble while only a few plants are affected, not the whole field.
From about 2 days after transplanting, walk the whole crop twice a week (every 3-4 days), looking at plants in all corners and the middle — not just the row by the path.
Cutworms: look for young plants cut clean off at ground level, worst overnight. Scratch the soil around a freshly cut plant in the morning to find the fat, greasy, grey-brown caterpillar curled into a 'C'; squash it.
Flea beetles: look for leaves peppered with tiny round 'shot-holes' (pinholes). Tap a plant and the little dark beetles jump away like fleas. A heavy attack in hot, dry weather can stunt small plants.
Bacterial wilt: look for a plant that wilts and collapses while still green — no yellowing first. To be sure, cut a wilted stem near the base and hang the cut end in a glass of clear water: a milky-white thread streaming down from the cut confirms wilt.
Pull and destroy any wilt-struck plant at once (see the wilt guide), and write down what you saw and where, so you can tell a spreading problem from a one-off.
- Watch out:
One plant wilting green, then a neighbour, then another along the wet line, is bacterial wilt marching in water — never irrigate from, or move wet soil out of, that patch.
- Do:
Carry a knife and a small clear jar of water when you scout, so you can do the wilt 'ooze in water' test on the spot.
Check establishment Critical
Every seedling that dies in the first two weeks is a plant's worth of fruit gone — and a gap left now stays empty all season, because a late replacement never catches up. Counting your take 1-2 weeks after transplanting tells you, while there's still time, whether to gap-fill.
About 1-2 weeks after transplanting, walk the rows and count how many seedlings are alive and standing against how many you set out.
Work out the share that took — for example, 90 living plants from 100 set out = 90%.
90% or more → a good take, carry on.
Below 90% → gap-fill now: lift a healthy spare seedling with a ball of soil and replant it into each gap in the cool of the day, then water it in. Do it in the next few days, while replacements can still catch the rest.
If plants keep dying even after replanting — and they wilt green without yellowing first — suspect bacterial wilt, not thirst. Stop replanting into that patch (do the 'ooze in water' test to confirm); fresh seedlings there will only die too.
- Do:
Keep a few spare seedlings back from the nursery for a week or two after transplanting, ready to fill any gaps.
- Tip:
Filling gaps in a patch where plants are wilting green — you'll only feed more seedlings to the wilt. Fix the drainage and rotate that ground next season instead.
Grow the frame — feed, weed and guard the shoots
The plants now build the leafy frame that will carry months of fruit — and for leaf types, the first harvests begin. Feed nitrogen to drive strong growth, keep the field weed-free, and start watching hard for the crop's number-one enemy, the fruit-and-shoot borer, whose caterpillars kill growing tips from the inside.
Top-dress nitrogen Recommended
African eggplant is hungry for nitrogen (N) — it drives the leaves and shoots that a long harvest is built on. But this crop feeds for months, so nitrogen works best given little and often rather than all at once, where a heavy rain would wash it past the roots before the plant can use it.
Start feeding from about 2 weeks after transplanting, once the plants are growing away, and keep feeding through the season — a little after each burst of picking or cutting.
Band the nitrogen (spread it in a line) a hand-span (about 20 cm) to the side of the plants, not on the stems, then cover it or water it in so it doesn't gas off and go to waste.
Use roughly a bottle-cap per plant as a rough guide, but follow the exact amount your recommendation gives for your field and soil.
Feed only when the soil is moist (after watering or light rain) — nitrogen on dry soil just sits there doing nothing.
- Do:
Feed a little after each round of picking or leaf-cutting — steady feeding keeps fruit setting and leaves regrowing tender.
- Watch out:
Act on the first bored, wilting shoot tip you see — the borer's damage adds up inside the plant, and a small problem now becomes a ruined crop later.
- Tip:
Fertiliser on wet leaves or against the stem — it scorches them. Keep it off food and water, and wash your hands afterwards.
Weed (stake vigorous fruit types) Recommended
Young African eggplant can't yet shade the ground, so weeds steal the water, food and light you are paying for, right when the plant is building its frame. And vigorous fruit types grow tall and carry heavy fruit — a stake keeps them from toppling under the load or in a storm.
Weed in the first few weeks after transplanting, before the weeds get bigger than the crop, and keep the field clean as the canopy fills in.
Hoe shallowly between and around the plants — deep hoeing close in cuts the crop's own roots.
In dry areas, leave the pulled weeds lying between the rows as a mulch to hold moisture and slow the next flush.
For vigorous fruit types, push a stake in beside each plant while it is still small and tie the main stem to it loosely, so it can carry a heavy fruit load without falling over.
- Do:
Weed just before you feed, so the nitrogen goes to the crop and not to the weeds.
- Tip:
Deep hoeing hard against the stems — you tear the feeder roots and open wounds that let soil disease in.
Start Shum leaf harvest (leaf crops) Optional
For leaf types (Shum / nakati), the leaves and tender shoots are the crop — and picking them early and often makes the plant push out even more soft new growth. The first cut can come as early as 3-5 weeks after transplanting, and steady cutting keeps a plant productive for weeks.
This is only for leaf (Shum) types: begin cutting from about 3-5 weeks after transplanting, once the plants are leafy and well rooted.
Pluck or cut the tender young leaves and shoot tips, taking the soft top growth and leaving enough lower leaves for the plant to keep feeding itself.
Come back every 1-2 weeks for the next cut — regular picking pushes out fresh, tender regrowth.
Feed a little after each cut (see the nitrogen task) so the plant has the food to grow the next flush of leaves.
Leaf is highly perishable — cut in the cool, keep it shaded and moist, and sell or eat it the same day.
- Do:
Cut lightly and often rather than stripping a plant bare — a plant left with working leaves regrows far faster.
- Watch out:
As you pick, check the undersides of the leaves for aphids and whitefly — you are handling the very leaves you'll sell.
Scout (shoot borer, aphids, whitefly) Critical
This is when the fruit-and-shoot borer arrives — its caterpillars bore into growing tips and kill them from inside, and later ruin the fruit. Aphids and whitefly suck sap and spread virus. Walking the crop twice a week and destroying the first bored shoots is what keeps a small attack from becoming a lost crop.
Walk the crop twice a week (every 3-4 days), checking plants right across the field, not just the edge.
Fruit-and-shoot borer: look for a growing tip that suddenly wilts and droops — a 'dead-heart' (the shoot has died from the inside). Near the wilted part you'll find a small hole plugged with droppings where the caterpillar bored in.
Cut off every wilted, bored shoot and destroy it — burn it or bury it deep. Don't just drop it on the ground, or the caterpillar inside lives on to breed again.
Aphids: look on shoot tips and the undersides of soft leaves for clusters of tiny green or black insects, curled leaves, and sticky, shiny 'honeydew' (often with ants running about).
Whitefly: shake a plant — if a cloud of tiny white flies rises from under the leaves, you have whitefly. Both pests leave sticky leaves and a sooty black mould.
Write down what you find. If bored shoots or sap-suckers are spreading, act — open the matching pest guide before deciding whether to spray.
- Do:
Make cutting and destroying bored shoots part of every scouting walk — sanitation is the borer's real weakness, because the caterpillar hides safe inside the plant where sprays can't reach it.
- Watch out:
If you do spray, do it safely: cover your skin, eyes and nose, spray in the cool of the day with the wind at your back, keep it off food, wash well after, and always respect the pre-harvest interval — the days you must wait between spraying and picking — because you eat and sell this fruit and leaf.
Flowering and fruit set — the make-or-break weeks
Flowers open and the first fruit sets — and this is the crop's thirstiest, most fragile stage. A few days of dry soil or fierce heat now makes flowers and tiny fruit drop off, and the borer moves from shoots into the fruit itself. Keep water steady and destroy bored shoots and fruit on sight, or the harvest you were building slips away.
Keep water steady through fruit set Critical
Flowering and fruit set is the most moisture-sensitive stage of the whole season. If the soil dries out or the plant wilts now — even for a day — it drops its flowers and young fruit to save itself, and that fruit is gone for good. Steady water is the difference between a heavy set and a bare plant.
From about 6-8 weeks after transplanting, once flowers and fruit are setting, keep the soil steadily moist — water every 5-7 days, more often in heat or on sandy soil that dries fast.
Check by pushing a finger in: water when the top finger-joint of soil (the first 3-5 cm) is dry, before the plant ever wilts.
Water evenly — a sudden swing from bone-dry to soaked can crack fruit and drop flowers as badly as drought does.
Keep water off the leaves where you can, and water in the cool, to avoid spreading leaf and soil disease in the wet.
- Watch out:
Water stress here aborts flowers and young fruit. If you can water at only one stage of the whole season, water now.
- Tip:
Letting the crop dry to wilting and then flooding it — the shock splits fruit and sheds flowers. Little and often beats feast-and-famine.
Remove bored shoots/fruit Critical
As fruit forms, the fruit-and-shoot borer switches from shoots to boring into the fruit — and a caterpillar hidden inside a fruit or stem is safe from any spray. Cutting out and destroying every bored shoot and fruit, again and again, is the one thing that truly breaks the borer's breeding cycle and saves the rest of your crop.
Every few days (every 3-5 days), walk the crop looking for wilted, drooping shoot tips and fruit with a hole plugged by droppings or a soft, rotting patch.
Cut off each bored shoot below the damage, and pick off every bored fruit, however small.
Destroy them — burn them, bury them deep, or feed them to livestock. Never leave them lying in the field, or the caterpillars crawl out, turn into moths and come straight back.
Do this at the same time as scouting and picking, so it becomes one steady habit rather than a big clean-up when it's too late.
- Do:
Treat this as free pest control you do with your hands — every bored shoot you destroy is a batch of future moths you've stopped.
- Tip:
Tossing bored fruit onto the compost heap or the field edge — that just breeds the next wave. Burn it, bury it, or feed it out.
Scout borer at fruit set Critical
At fruit set the borer does its costliest damage — straight into the fruit you meant to sell. Checking twice a week now tells you exactly where the caterpillars are so you can cut them out before they spread, and warns you early if numbers are climbing past what hand-picking can hold.
Twice a week (every 3-4 days), check growing tips and fruit of every size across the whole crop.
On shoots, look for the wilting 'dead-heart' tip; on fruit, look for a small entry hole plugged with droppings, and cut one suspect fruit open to find the tunnel and caterpillar inside.
Remove and destroy every bored shoot and fruit you find, the same as in the removal task — scouting and destroying go hand in hand.
Note how many plants show fresh boring. If it is climbing fast and hand-removal isn't holding it, open the borer guide to choose a control — and time any spray for the egg and young-caterpillar stage, since grown caterpillars are hidden safe inside.
- Watch out:
Fresh, moist droppings at a shoot or fruit hole mean the caterpillar is still inside and feeding — that plant needs cutting today.
- Watch out:
If you spray, respect the pre-harvest interval (the wait between spraying and picking that the product demands) — you are picking this fruit every few days.
Pick and keep picking
One planting now pays you back for months. Fruit is picked young and firm every few days; leaf types are cut tender every week or two. The secret to a long, heavy harvest is to keep picking on time and to keep feeding and watering — every picked fruit and every fed plant tells it to set the next flush.
Pick fruit / cut leaf repeatedly Critical
African eggplant fruit is best young — full-sized but still firm and glossy. Many types are pleasantly bitter even at their best, so let the skin and seeds, not the bitterness, tell you when to pick. Left too long, a fruit turns harshly bitter, seedy and tough, won't sell, and tells the plant to stop setting new fruit. Picking every few days, at the right moment, both gives you the best fruit and keeps the plant flushing for months.
Start picking from about 8-9 weeks after transplanting, then come back every 3-5 days — this is a crop you harvest little and often, not all at once.
Pick a fruit when it is at full size for its type, its skin firm and glossy, and the flesh springs back to a gentle press. Pick it before the skin dulls and the seeds inside harden — a young fruit's natural bitterness is fine and expected, so don't wait for it to 'sweeten'.
Cut the fruit off with a short stalk rather than tugging — pulling tears the branch and bruises the fruit.
For leaf (Shum) types, keep cutting the tender leaves and shoot tips the same way every 1-2 weeks.
Handle everything gently and keep the harvest cool and shaded — fruit bruises easily, and leaf must be sold or eaten the same day.
If a fruit fails the test — skin gone dull, flesh no longer springy, seeds hard and browning, and the taste turned harshly bitter — it is over-ripe: pick it off and discard it or feed it out anyway, so the plant puts its strength into new fruit.
- Tip:
Letting fruit over-ripen on the plant — it turns tough and seedy, won't sell, and shuts down new fruit set.
- Do:
Pick on time, every few days — a plant kept picked keeps flowering; a plant left loaded quits.
Feed + water for successive flushes Recommended
A crop that keeps giving for months must keep being fed and watered, or the flushes get smaller and the plant tires. A steady feed of nitrogen (N) every couple of weeks, plus reliable water, keeps fruit setting and leaves regrowing tender right through the long harvest.
Through the harvest, feed every 2-3 weeks — a light top-dress of nitrogen spread around the plants, at the amount your recommendation gives.
Apply it on moist soil and water it in; a small feed after each big picking round keeps the plant flushing.
Keep the water coming too — a well-fed plant with dry soil still drops its fruit.
Well-rotted manure or wood ash worked in alongside adds potassium (K), which this crop is hungry for and which firms up the fruit and improves its taste.
- Do:
Tie feeding to picking — a small feed after each big pick keeps the next flush coming.
- Watch out:
Spread fertiliser around, not against, the stems, keep it off wet leaves and off the fruit you'll eat, and wash your hands after.
Clear up and rotate for next time
When picking is finally over, how you close the season decides how easy next season is. The old plants hide borer caterpillars and wilt germs ready for the next crop. Handle the last fruit gently, then pull and destroy the residues and move the crop to fresh, non-tomato-family land — this is where a clean run next year is won or lost.
Remove residues + rotate Recommended
The finished crop is a store of trouble for the next one — spent stems carry borer pupae, and the soil may hold bacterial wilt germs that live on for years. Clearing the residues and rotating away from the tomato family starves those pests and diseases and gives your next planting a clean start. Rotation, drainage, prompt borer control and cool handling are where this crop is saved or lost.
Once picking is over (from maturity onwards), pull out the old plants and remove all the crop residue from the field.
Destroy the residue — burn it or bury it — so any borer caterpillars and pupae inside the stems and leftover fruit die instead of breeding the next generation.
Rotate the plot to a non-tomato-family crop — a cereal (maize, sorghum) or a legume (beans, groundnuts) — and keep tomato, potato, pepper and eggplant off it for at least 2-3 seasons.
Handle the last of the fruit gently and keep it cool and shaded — it bruises easily; any leaf is highly perishable and must be sold the same day.
- Do:
Handle fruit gently and keep it cool and shaded — it bruises easily; leaf is highly perishable, so sell it the same day.
- Do:
Remove and destroy every crop residue and rotate to a non-tomato-family crop (a cereal or legume) — it's the cheapest wilt and borer control there is.
Pests and diseases that attack African eggplant


Grow African eggplant with a plan, not a guess
This guide is the general answer. Divisi works out yours — the week to plant African eggplant on your soil and your rainfall, and each job dated for your field.


When to plant African eggplant, country by country
- When to plant African eggplant in Algeria
- When to plant African eggplant in Angola
- When to plant African eggplant in Benin
- When to plant African eggplant in Botswana
- When to plant African eggplant in Burkina Faso
- When to plant African eggplant in Burundi
- When to plant African eggplant in Cabo Verde
- When to plant African eggplant in Cameroon
- When to plant African eggplant in Comores
- When to plant African eggplant in Congo
- When to plant African eggplant in Côte d'Ivoire
- When to plant African eggplant in Egypt
- When to plant African eggplant in Eritrea
- When to plant African eggplant in Eswatini
- When to plant African eggplant in Ethiopia
- When to plant African eggplant in Gabon
- When to plant African eggplant in Gambia
- When to plant African eggplant in Ghana
- When to plant African eggplant in Guinea Ecuatorial
- When to plant African eggplant in Guinea-Bissau
- When to plant African eggplant in Guinée
- When to plant African eggplant in Kenya
- When to plant African eggplant in Lesotho
- When to plant African eggplant in Liberia
- When to plant African eggplant in Libya
- When to plant African eggplant in Madagascar
- When to plant African eggplant in Malawi
- When to plant African eggplant in Mali
- When to plant African eggplant in Mauritanie
- When to plant African eggplant in Mauritius
- When to plant African eggplant in Morocco
- When to plant African eggplant in Moçambique
- When to plant African eggplant in Namibia
- When to plant African eggplant in Niger
- When to plant African eggplant in Nigeria
- When to plant African eggplant in Rwanda
- When to plant African eggplant in République centrafricaine
- When to plant African eggplant in République démocratique du Congo
- When to plant African eggplant in Sao Tome and Principe
- When to plant African eggplant in Seychelles
- When to plant African eggplant in Sierra Leone
- When to plant African eggplant in Somalia
- When to plant African eggplant in South Africa
- When to plant African eggplant in South Sudan
- When to plant African eggplant in Sudan
- When to plant African eggplant in Sénégal
- When to plant African eggplant in Tchad
- When to plant African eggplant in Togo
- When to plant African eggplant in Tunisie
- When to plant African eggplant in Uganda
- When to plant African eggplant in United Republic of Tanzania
- When to plant African eggplant in Zambia
- When to plant African eggplant in Zimbabwe
Where African eggplant scores best
Districts where Divisi's engine currently rates this crop highest, ranked by fit.


Get Insights by email
A short digest of new Divisi articles. No email on quiet weeks.
Frequently asked questions
How do I grow African eggplant?
How to grow African eggplant: 90–125 days to maturity, 90 cm rows, 0.5–1 cm deep. Also called garden egg, nyaadowa, aubergine africaine, nakati, ngogwe.
What is nyaadowa in English?
Nyaadowa is the Akan name for African eggplant.
What is aubergine africaine in English?
Aubergine africaine (also gilo) is the French name for African eggplant.
What is nakati in English?
Nakati (also ntula) is the Luganda name for African eggplant.
What is ngogwe in English?
Ngogwe is the Swahili name for African eggplant.
What is igba in English?
Igba is the Yoruba name for African eggplant.
How long does African eggplant take to grow?
African eggplant takes about 90–125 days from sowing to maturity, though the exact length varies with variety, temperature and how the season runs.
What spacing should I use for African eggplant?
Space African eggplant rows about 90 cm apart, with roughly 90 cm between plants within the row.
How deep should African eggplant be planted?
Sow African eggplant at about 0.5–1 cm deep. Shallower risks drying out; deeper wastes seed energy before the shoot reaches light.
What pests and diseases attack African eggplant?
The ones covered in this guide are Eggplant fruit and shoot borer, Flea beetles. Each has its own page explaining how to identify, check for and control it.