 Divisi
How to grow spider plant
Cleome gynandra · Cleomaceae
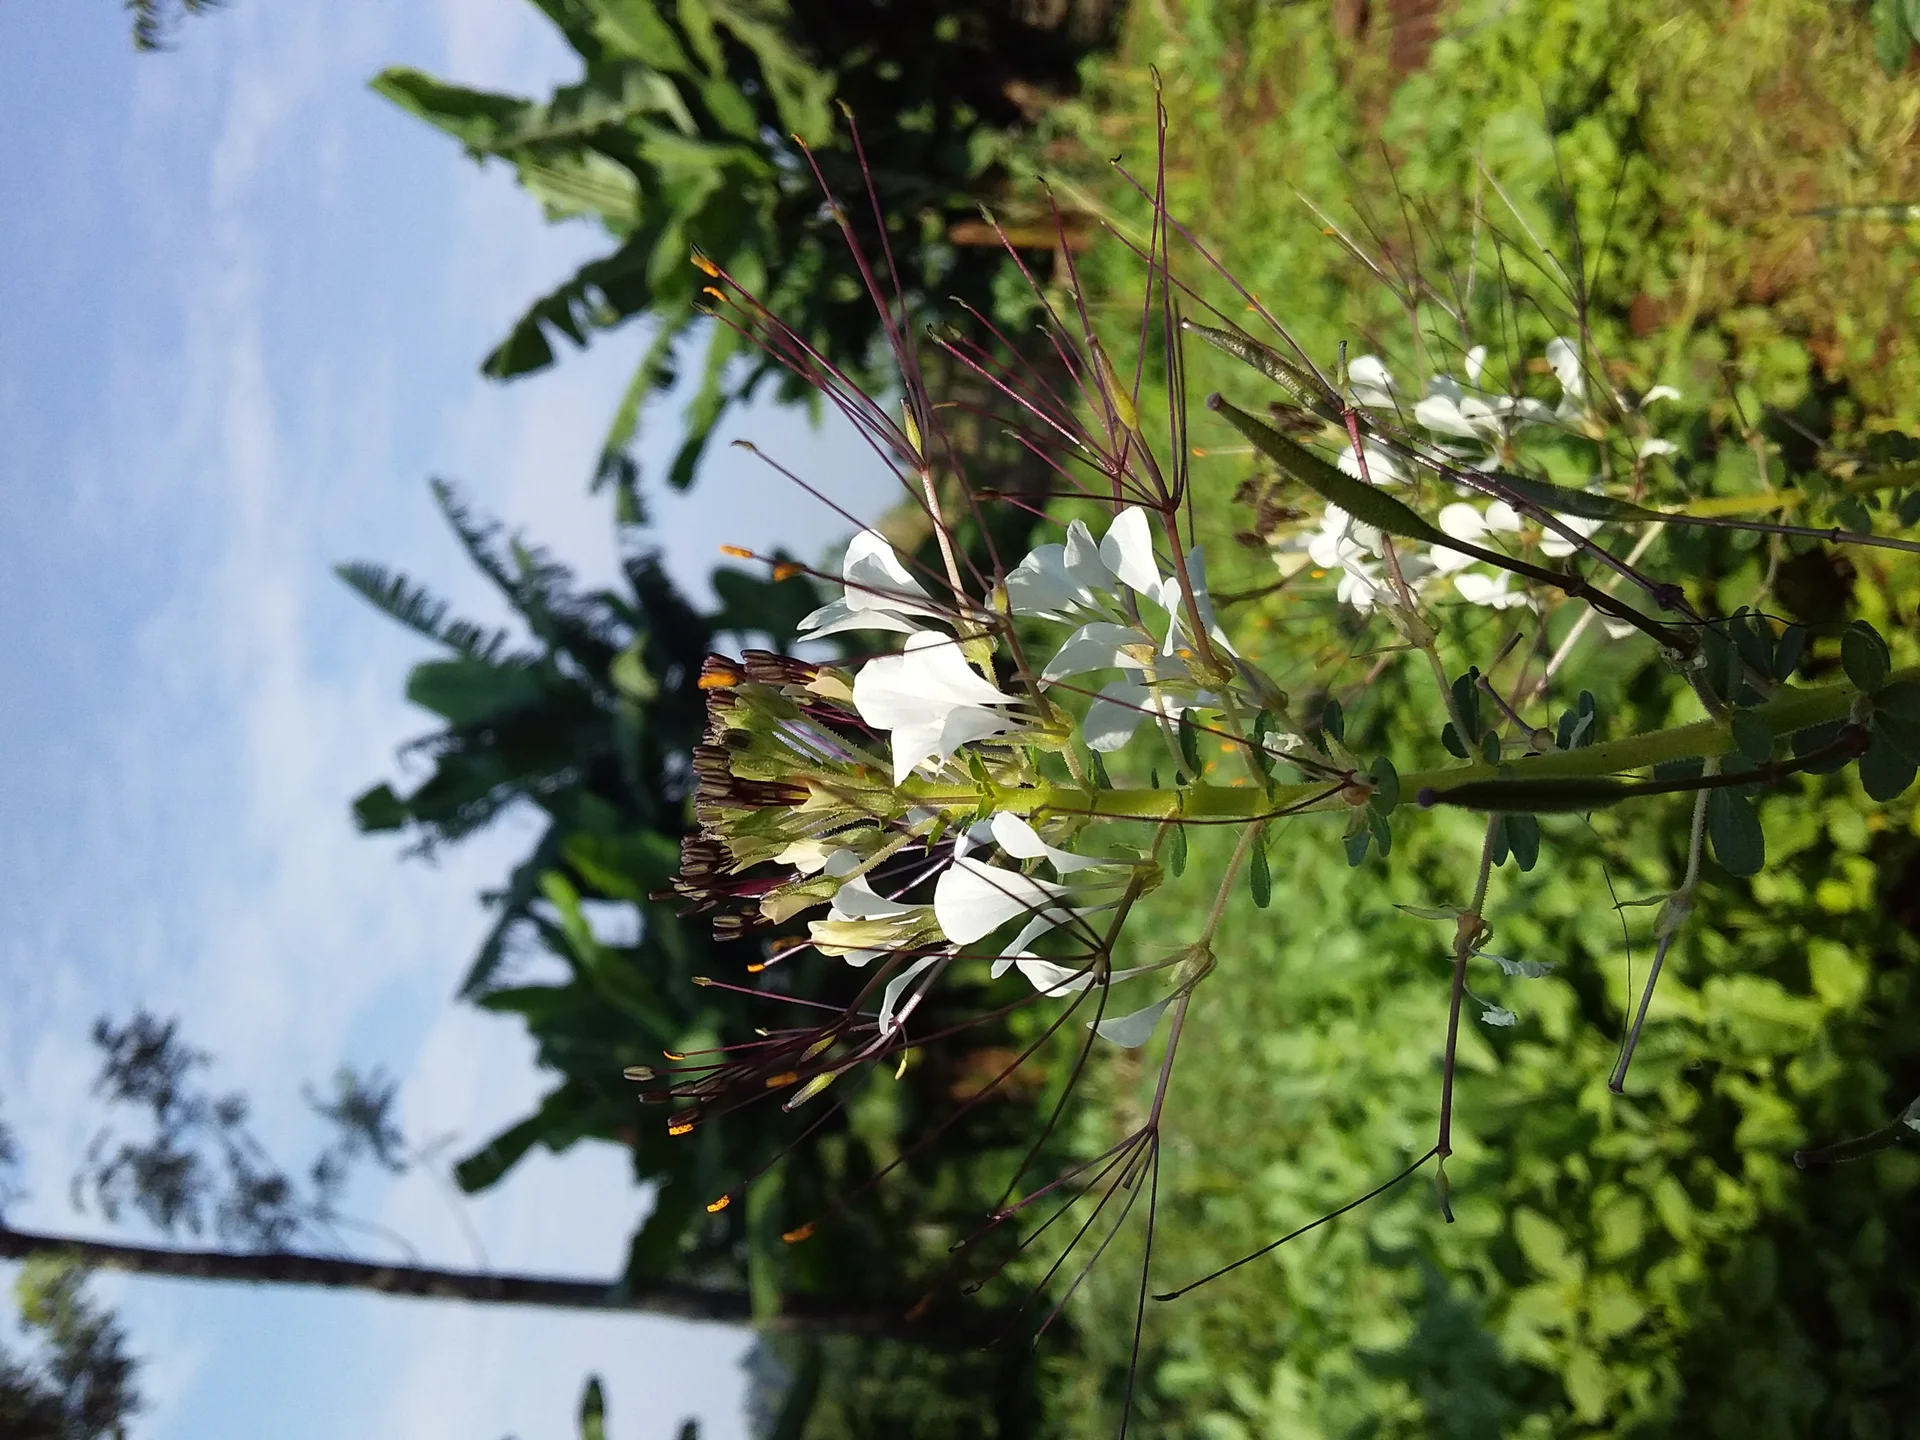
Photo: Kibet254 · CC BY-SA 4.0
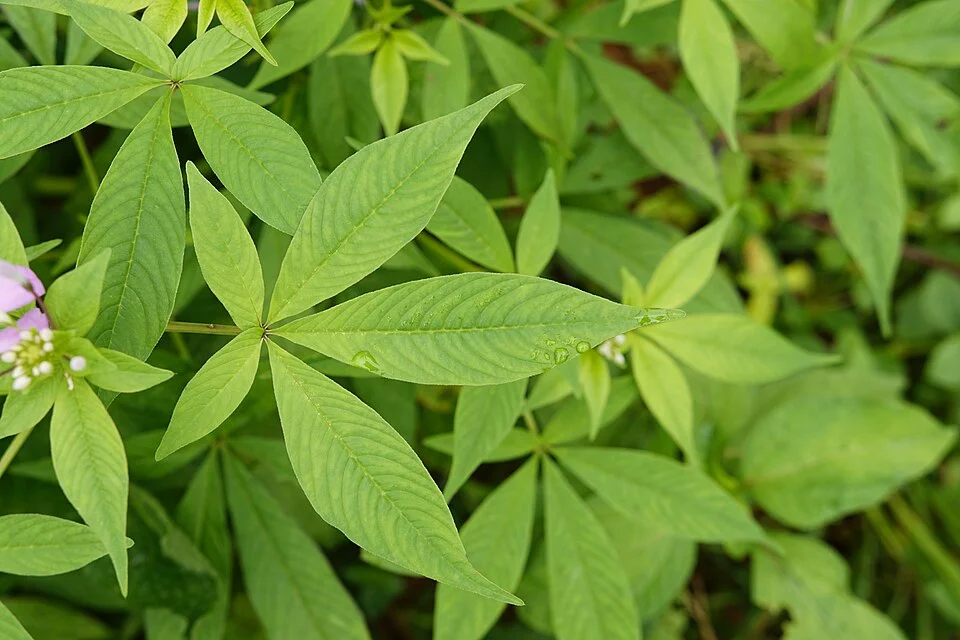
Spider plant (Cleome gynandra) — known as chinsaga, dek, mgagani, tsisaka, munyevhe and 'African cabbage' — is a tough, fast leafy vegetable of the drylands. It laughs off the heat and dry spells that flatten softer greens, springs from dust-fine seed, and gives you your first leaf in about a month. The leaves are rich but bitter, so they are cooked, and usually blanched first — dipped for a moment in boiling water — to soften the bite. It asks for little: a rich, well-drained bed, a little feeding, and steady water while it is young, and it pays you back with leaf you can cut again and again for weeks. Its one real trick is the seed — fresh seed is 'asleep' and comes up badly, so rested seed and a warm, dark, damp seedbed are everything.
Vengolis · CC BY-SA 4.0 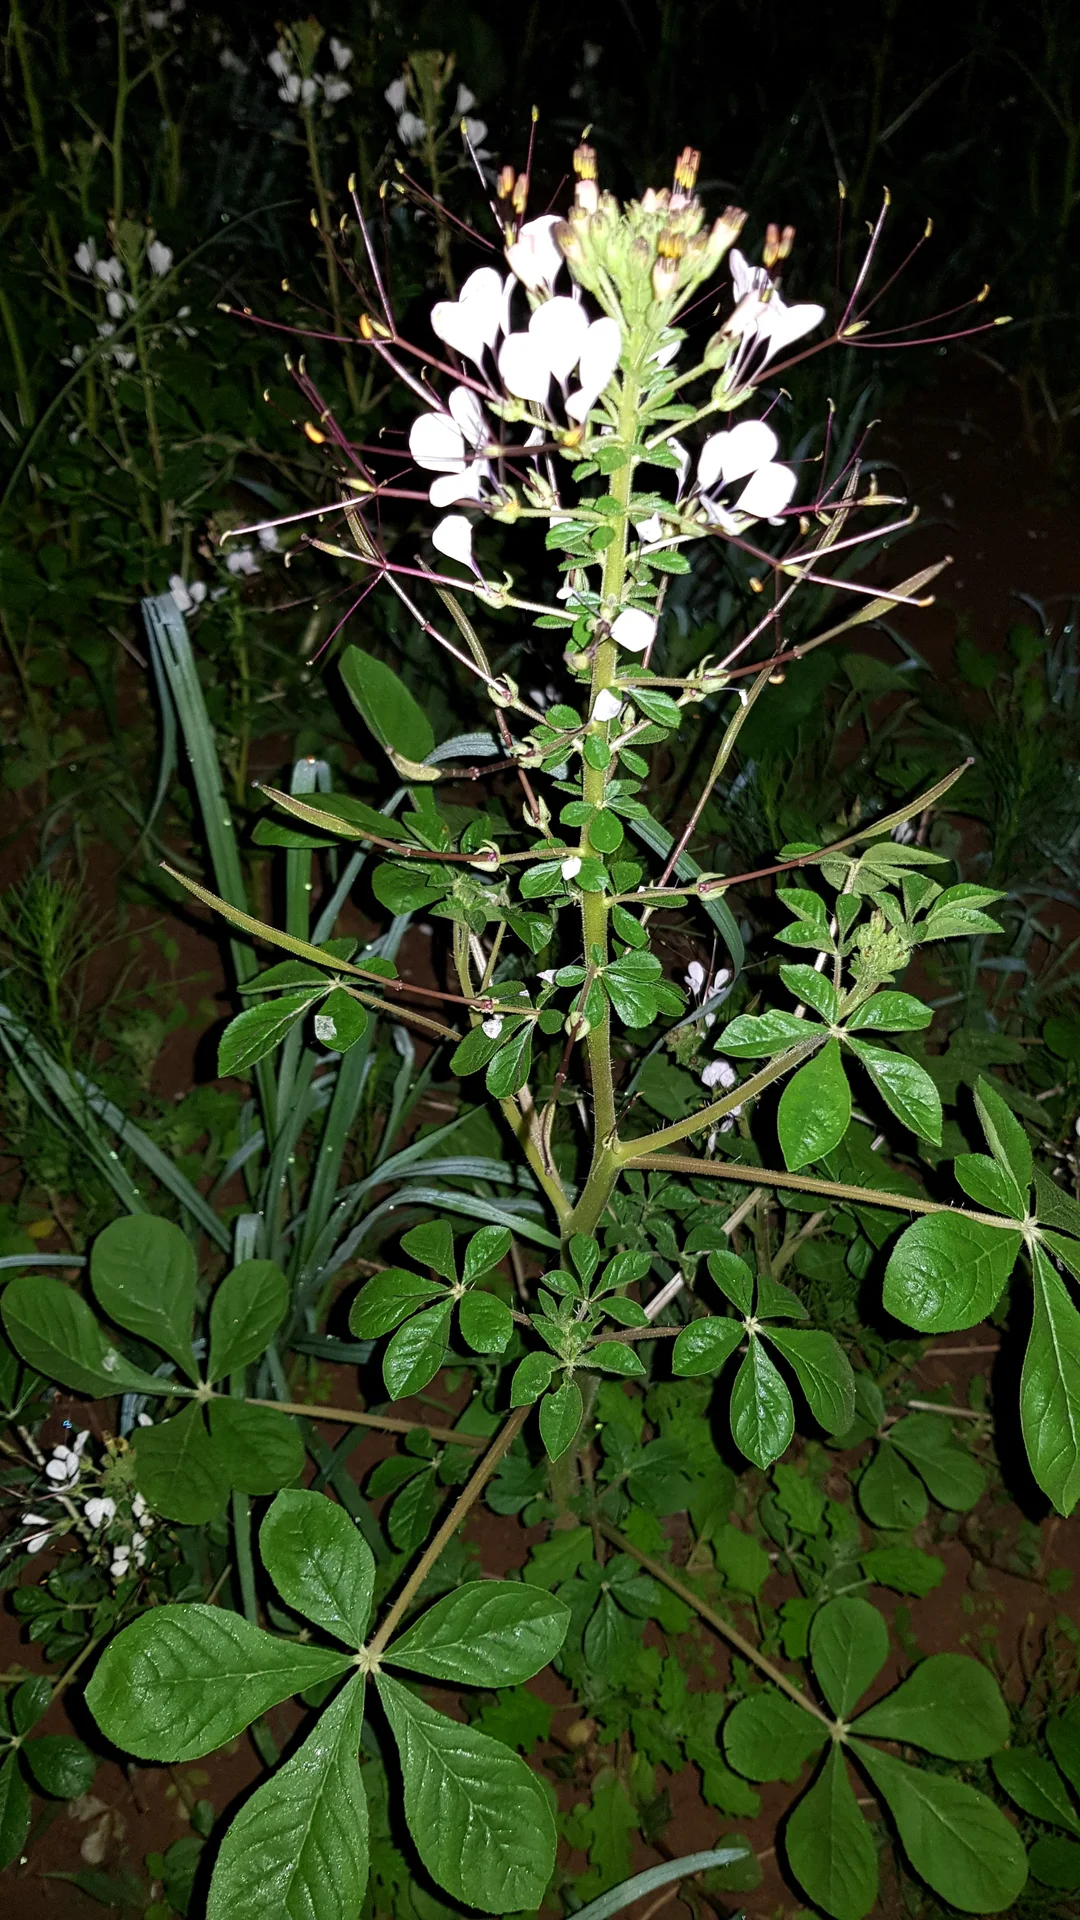
Sosicles Ennius · CC BY-SA 4.0
- Days to maturity
- 60–90 days
- Row spacing
- 30 cm
- Plant spacing in the row
- 12 cm
- Sowing depth
- 0.5–1 cm
These are general figures for the crop, compiled from published agronomic references including FAO and CABI. The right choice for your field depends on your soil, rainfall and the yield you are aiming for.
Will spider plant actually do well on your field? Check your own field against every crop in the catalogue — no signup. Run the crop check →
Also known as
Spider plant is also called cat's whiskers and African cabbage.
- English
- cat's whiskers, African cabbage
- Gusii
- chinsaga
- Kalenjin
- saget
- Kamba
- mwianzo
- Luganda
- jjobyo
- Luhya
- tsisaka
- Luo
- dek
- Shona
- munyevhe
- Soga
- yobyu
- Swahili
- mgagani
Working in buckets, bags or paces? The farming glossary turns the measures growers actually use into kilograms and hectares — what a 20 litre bucket of each crop really weighs, and how to size a field by walking it — alongside the Shona, Swahili, Ndebele and Yoruba words used in the field. Open the glossary →
Growing spider plant, stage by stage
Your spider-plant season, step by step — from waking fussy, dust-fine seed and coaxing it up in warm, dark soil, through thinning and feeding the tender young crop and guarding its leaf from aphids, to cutting leaf again and again and saving your own seed for next year.
Get ready: seed and bed
Spider plant lives or dies on whether the seed comes up — and that is decided now, before you sow. Fresh seed is 'asleep' (dormant) and sprouts poorly; seed that has rested dry for six months or more has woken up and comes up far better. So get good rested seed, prove it will grow, and build a fine, rich, free-draining bed that gives the tiny, weak seedlings an easy start.
Source aged seed (≥6 months) Critical
Spider-plant seed is 'asleep' (dormant) when it is fresh — sow it straight off a just-picked plant and most of it will never come up, leaving you a thin, gappy patch you cannot fix later. Seed that has rested dry for six months or more has woken up and sprouts far better. Sorting your seed out in the month before you sow is the single biggest thing standing between you and a good stand.
Use seed that has been stored dry for at least 6 months — up to about a year is ideal. Seed you saved last season and kept dry is perfect; seed just picked off a plant is not ready to sow.
Sort your seed out in the month before sowing, so you still have time to test it and, if it is slow, wake it up or find better.
Keep the seed dry, cool and in the dark right up to sowing — damp or hot storage kills it before it ever reaches the ground.
If you fear the seed is still sleepy, wake it up (break its 'sleep'): rub it gently with sand or between two bits of sandpaper to scratch the hard coat, soak it in water overnight (about 16 hours), or keep it somewhere warm (about 40°C — a hot room) for a day or two before sowing.
- Do:
Save your own seed from your strongest, healthiest plants each year and store it dry — rested home seed is often your most reliable.
- Tip:
Sowing fresh, just-picked seed — it is 'asleep' (dormant) and comes up poorly, however good it looks.
- Watch out:
Keep stored seed away from damp and heat, or it dies in the store and you won't know until nothing comes up.
Pre-test germination Recommended
Because spider-plant seed is so often 'asleep', you can waste a whole sowing — and weeks of the season — on seed that was never going to come up. A quick sprout test one to two weeks before you sow tells you whether this seed is alive, while you still have time to wake it, sow it thicker, or find better.
Take a pinch of seed at random from your batch — count out about 20 seeds if you can (they are tiny).
Lay them on a damp cloth or piece of tissue, fold it over, and keep it somewhere warm and dark — spider-plant seed needs darkness and warmth to sprout. Keep it just damp, not dripping; wet it again if it dries.
Leave it about a week, then count how many have pushed out a little white root or shoot.
Work out the share that sprouted — for example, 10 out of 20 is half (50%).
Half or more sprouting (at least 5 in every 10) → the seed is good enough, sow it. Spider plant naturally comes up less evenly than grains, so half is a fair pass.
If fewer than half sprout → don't trust this seed. First wake it up (soak overnight or scratch the coat) and test again; or buy fresh aged / certified seed; or plan to sow much thicker and thin later. Sort it out before you commit the field.
- Do:
Run the test a week or two before sowing, so you still have time to swap or wake the seed if it fails.
- Watch out:
Keep the test dark and warm — light and cold hold spider-plant seed back and can make good seed look dead.
Prepare fine, fertile, drained bed + manure Recommended
The seed is dust-fine and the seedlings are weak — they need a soft, crumbly, rich bed to push through and get going. Well-rotted manure feeds the soil, helps it hold moisture through a dry spell, and gives the phosphorus (P) that drives strong early roots. A rough, hard or hungry bed gives you a thin, struggling stand.
Dig the bed over and break the soil down to a fine, crumbly tilth (loose, crumbly soil with no big clods). Dust-fine seed cannot climb up through lumps and air pockets.
Spread well-rotted manure or compost — dark, crumbly, no strong smell — evenly over the bed. A wheelbarrow-load (about 50 kg) covers roughly a patch 10 paces by 10 paces (about one stride each way); use up to twice as much on poor, sandy soil.
Work the manure into the topsoil and level the bed so water spreads evenly and never pools. Spider plant hates 'wet feet' (waterlogged roots), so on flat or heavy ground make raised beds or ridges to drain.
If your soil is known to be poor in phosphorus (P) — the nutrient that builds early roots — work in a little P fertiliser (such as single superphosphate) now; your recommendation gives the amount.
- Tip:
Fresh, raw manure — it scorches the tiny seedlings and brings in weed seeds. Use only manure that is well rotted (dark, crumbly, no strong smell).
- Do:
On flat or heavy land, sow on raised beds or ridges — good drainage stops seed and seedlings rotting in a wet spell.
- Watch out:
Wash your hands after handling manure, and keep it off anything you'll eat and out of the drinking water.
Sowing and germination — the make-or-break stage
This is the stage that makes or breaks the crop. Spider-plant seed is fussy: it sprouts best in darkness, in warm soil, when hot days swing to cooler nights (that day-night swing helps wake it). Sow shallow, cover lightly, and keep the bed damp and warm until the seedlings are up — about 5 days, sometimes up to two weeks. Get this right and the rest of the season is easy.
Sow shallow + light cover Critical
Everything rides on getting the seed to come up. Sow it too deep and the tiny seed runs out of strength before it reaches the light; leave it bare in bright sun and it won't sprout at all — this seed germinates in the dark. A shallow, light cover in warm, moist soil gives you the even stand the whole season is built on.
Sow on a warm day when the soil is moist. Spider plant likes warm soil — best around 30°C by day, cooler at night.
Because the seed is dust-fine, first mix your pinch of seed with a handful of dry sand or wood ash. Then you can scatter it thinly and evenly instead of in clumps.
Sow in rows about 30 cm apart — one and a half hand-spans (a hand-span is thumb-tip to little-finger-tip with the fingers spread, about 20 cm). Dribble the seed-and-sand thinly along a shallow line, or scatter it over the bed.
Cover the seed only ½–1 cm deep — a fingernail's depth — with a light sprinkle of fine soil. It sprouts in the dark, so it needs a cover; but a deep cover buries it too far to ever reach the top.
Firm the soil gently over the seed so it sits snug in moist earth, and keep the bed damp. Seedlings show in about 5 days, up to 14.
- Tip:
Sowing too deep, or leaving seed bare on top — deep seed hasn't the strength to reach the light, and bare seed in bright light won't sprout. Aim for a light cover, no more than a fingernail deep.
- Do:
Mix the fine seed with dry sand or ash so you can spread it thinly — sown neat, it comes up in thick clumps you'll only have to thin out.
- Watch out:
Sow into warm, moist soil — cold or dry soil leaves the seed just sitting there, and gives you a thin, late stand.
Keep moist & warm Critical
The shallow-sown seed sits right at the surface, where the soil dries out fastest. If it dries even once while it is sprouting, the seed dies and you lose the stand — and those seedlings cannot be replanted. Keeping the bed damp and warm every day through the first week is what carries the seed through to standing seedlings, and the natural hot day / cooler night swing helps wake any still-sleepy seed.
From sowing until the seedlings are up (about the first week), keep the top of the bed damp at all times — never let it dry out.
Water gently with a fine spray (a watering-can rose) or a soft sprinkle, once or twice a day in warm weather. A hard splash washes the fine seed away or buries it too deep.
Water in the cool of the morning or evening, so less is lost to the sun and the surface stays moist longer.
A very light mulch — thin dry grass, or a shade cloth — helps hold moisture and warmth. But lift it the moment seedlings appear, or they stretch thin reaching for light.
If a hot, dry spell keeps drying the bed out, water more often and shade it in the heat of the day. One missed day at this stage can cost you the whole sowing.
- Do:
Water little and often with a fine spray — steady damp beats one big soaking that crusts the surface into a hard cap the seedlings can't break.
- Tip:
Letting the bed dry out for even a day while the seed is sprouting — those seedlings die and cannot be replaced.
- Watch out:
Watch for damping-off: seedlings that suddenly flop over with a thin, water-soaked, pinched brown stem right at the soil line, in bare patches that spread. It comes from too much water and poor drainage — so keep the bed damp but never soggy, water in the morning, and sow on raised, well-drained ground.
Establishment and thinning
Now the young crop must get ahead of the weeds and stand at the right spacing. Spider-plant seedlings are weak fighters — so thin them to give each one room, weed early before weeds smother them, and start a little feeding to drive fast, tender leaf. This stage and the next are when steady moisture matters most, so never let the young crop go thirsty — a dry check now makes it bolt (rush to flower) instead of making leaf.
Thin to 10–15 cm Recommended
Sown from dust-fine seed, spider plant nearly always comes up too thick. Crowded seedlings fight one another for light, food and water, and all stay small and spindly. Thinning to one strong plant every hand-width — about two to three weeks after sowing — lets each plant bush out, and gives you far more leaf in the end.
When the seedlings have a few true leaves (their first proper leaves, about 2–3 weeks after sowing), pull out the weakest so the ones left stand about 10–15 cm apart — a hand-width (across your palm, about 10 cm) along the row.
Keep the strongest, sturdiest seedlings; take out the thin, weak and crowded ones.
Thin when the soil is damp — the seedlings you keep are disturbed less and settle straight back.
Don't waste the thinnings — the young pulled seedlings are good to eat, so they are your very first harvest.
- Do:
Thin on damp soil so the plants you keep aren't loosened at the root.
- Tip:
Leaving the crop thick and crowded — a mat of thin, spindly plants gives far less leaf than fewer strong ones.
- Watch out:
Thin in good time — leave it too long and the crowded seedlings have already starved each other tall and weak, and never fully recover.
Early weeding Critical
Young spider plant is a poor fighter — weeds grow faster and will quickly smother the weak seedlings, stealing the light, water and food they need. Getting the weeds out early, from about a week after sowing, protects the stand at its most helpless moment. A clean start now is worth more than any effort later.
Start weeding from about a week after sowing, as soon as you can tell the crop rows from the weeds.
Pull weeds by hand close to the seedlings — spider-plant roots are shallow, and a hoe swung too near will slice them.
Weed when the soil is damp so weeds come up roots and all; a weed just chopped at the top grows straight back.
Take care not to trample or bury the tiny seedlings as you work.
- Do:
Weed while both weeds and crop are still small — hand-pulling close in is safest for the shallow spider-plant roots.
- Tip:
Deep hoeing right beside the plants — it cuts the shallow roots and sets the crop back.
- Watch out:
Weeds left now smother the seedlings within days — this is the cheapest yield you will ever save.
Start nitrogen / manure Recommended
Spider plant is grown for its leaf, and leaf is built on nitrogen (N). Unlike beans, it does not make its own nitrogen — you must feed it. A first light feed two to three weeks after sowing, once the crop is thinned and weeded, pushes the fast, tender leaf that makes this crop worth growing. Starved plants stay small and pale and rush to flower.
Once the crop is thinned and weeded (about 2–3 weeks after sowing), give a light first feed of nitrogen or well-rotted manure. Your recommendation gives the amount.
Lay it in a thin band along the row, about a hand-width (10 cm) to the side of the plants — not touching the stems or leaves.
Feed onto damp soil and water it in, so it reaches the roots instead of gassing off into the air or scorching the crop.
Keep fertiliser off the leaves — grains stuck on wet leaves burn them, and those leaves are what you eat.
- Do:
Feed light and often rather than one heavy dose — a leafy crop uses a steady trickle of nitrogen best.
- Tip:
Piling fertiliser against the stems — it burns the plants wherever it touches.
- Watch out:
Keep fertiliser off food and out of reach of children and animals, and wash your hands after handling it.
Vegetative leaf growth
Now the crop bulks up into leafy, branching plants — the leaf you will harvest again and again. Feed it, keep the water steady (a dry check makes it bolt — shoot up to flower early and stop giving leaf), and start watching for the pests that love its tender leaves. In the heat this C4 crop grows fast — and so can the pests, so check it often.
Top-dress nitrogen / manure Recommended
This is when the plant builds the most leaf, and leaf runs on nitrogen (N). A top-up feed from about three weeks after sowing keeps the leaf coming tender, green and fast. Splitting the nitrogen — some now, more after later cuts — means the rain washes less of it away and more goes into your crop. Steady food and steady water together also hold off early flowering.
From about 3 weeks after sowing, and again after each later cut, scatter a light top-dressing of nitrogen (or well-rotted manure) along the rows. Your recommendation gives the amount — split it into small feeds rather than one big one.
Put it on damp soil and water it in, so it feeds the roots and doesn't gas away into the air.
Keep the fertiliser off the wet leaves — it scorches them, and those leaves are what you eat.
Wash your hands after handling fertiliser, and keep it away from food, water and children.
- Watch out:
If leaves wilt at midday and don't perk up by evening, the crop is thirsty — water it, because a dry check makes spider plant bolt (rush to flower) and stop giving leaf.
- Tip:
One big dose of nitrogen — a heavy rain washes it straight past the roots. Feed little and often instead.
- Do:
Feed just after a cut — fresh nitrogen drives the next flush of tender leaf.
Scout (aphids, bugs, beetles) Recommended
A few pests can turn your leaf crop into something no one will eat. Cabbage aphids can build from a handful of insects into a plant-killing crust in days and cause total loss; bagrada bugs and flea beetles scorch and pepper the leaves. Two quick checks a week, from about three weeks after sowing, let you rub out the first small colonies before they explode — far easier than fighting a full outbreak.
Twice a week (every 3–4 days), walk the bed and look closely at the growing tips and the undersides of leaves on plants here and there.
Cabbage aphid: look for grey-green, powdery (mealy) clusters packed on the shoot tips and leaf undersides, with curling, yellowing leaves and sticky honeydew (the sugary droplets they leave) that grows a black sooty mould. They love cool, dry weather. Act when colonies sit on the growing tips, or about 1 in 10–20 plants is infested: squash or wash out the first small colonies at once, or spray with soapy water, wetting the undersides and tips well.
Bagrada bug: look for a small black, shield-shaped stink bug with orange-and-white markings on seedlings and around the plant base, and pale, scorched star-burst patches where it has fed; badly-hit young plants go stunted or grow no tip. Any bugs on seedlings, or fresh star-burst marks on 1 in 10 young plants → act: hand-pick them in the cool morning, clear away nearby cabbage-family weeds (wild mustards and the like) that shelter them, and spot-spray the plant base only if you must.
Flea beetle: look for tiny shiny beetles that jump like fleas when you disturb them, and lots of little round 'shot-holes' peppering the leaves like a sieve. Seedlings suffer most. More than 2–3 fresh holes per leaf, or wilting seedlings → act.
Note what you find and where. If any pest is over these levels, act now — wash off aphids, hand-pick bugs, or spot-spray just the affected patch — and open that pest's guide for the full how-to.
- Do:
Hit the first aphid colonies while they're small — a wash or soapy spray then saves the crop; a week later they can crust over and kill it.
- Tip:
Blanket-spraying strong poisons — it kills the ladybirds and tiny wasps that eat aphids for free, and leaves residue on leaf you'll pick soon. Reach for washing, soap and hand-picking first.
- Watch out:
If you must spray: cover your skin, nose and eyes, spray in the cool of the day with the wind at your back, keep it off any leaf you'll pick soon, wait out the pre-harvest interval (the label's gap between spraying and eating), and wash well afterwards.
Repeated leaf harvest (cut-and-come-again)
Spider plant gives you leaf again and again. The first cut comes about four to six weeks after sowing, then every 1–2 weeks. Cutting the tips makes the plant branch out and grow more leaf, and pinching off the flower buds stops it bolting (running to seed) and keeps tender leaf coming for weeks. Feed and water between cuts to keep the flushes flowing.
First cut of tender tips Recommended
The first cut, about 4–6 weeks after sowing, isn't just food — it's what turns one stem into a bushy, branching plant. Pinching out the tip now makes the plant throw out side-shoots, so every later cut gives you more. Leave it too long and the plant shoots straight to flower and gives you little leaf.
Take the first cut when plants are about 20 cm tall — a hand-span (thumb-tip to little-finger-tip, fingers spread) — with plenty of tender leaf, roughly 4–6 weeks after sowing.
Pinch or snip out the top few centimetres of each main shoot — the tender tip and young leaves. This makes the plant branch into many shoots.
Pinch off any flower buds you see at the same time. Early flowering (bolting) stops leaf growth; nipping the buds keeps the plant leafy.
Harvest in the cool of the morning — the leaf is crisp then and keeps longer. Handle it gently; it bruises and wilts fast.
- Do:
Pinch out flower buds as soon as they show — it clearly lifts your total leaf harvest.
- Tip:
Waiting too long for one big first cut — an over-mature plant bolts to flower, and the leaf turns tough and bitter.
- Watch out:
A plant pushing up a tall central flower stalk is bolting (running to seed) — cut and pinch it back and keep the water steady, or leaf growth stops.
Re-cut + pinch flowers + feed Recommended
This is how spider plant pays you back for weeks: cut, pinch, feed, repeat. Every 1–2 weeks you take young leaf and tips, pinch out flower buds to stop it bolting (running to seed), and give a little food and water so the plant pushes another flush. Keep the rhythm and one sowing feeds the family for a month or more; drop it and the plant flowers and quits.
Cut again every 1–2 weeks, taking the young leaves and tender shoot tips and leaving enough lower leaf for the plant to keep growing.
Each time, pinch out every flower bud you can see. This is the key to a long harvest — flowering (bolting) is what ends it.
Feed and water between cuts: a light nitrogen or manure feed and steady moisture drive the next flush of tender leaf. A thirsty, hungry plant bolts and turns bitter.
Keep cutting in the cool morning, and use or preserve the leaf quickly — it wilts within hours of picking.
- Do:
Keep the cut–pinch–feed rhythm going — regular cutting itself keeps the plant leafy and delays flowering.
- Watch out:
Watch again for grey, powdery cabbage-aphid clusters on the tips between cuts — wash them off early; and if you must spray this close to harvest, respect the pre-harvest interval (the label's gap between spraying and eating) so you never eat sprayed leaf.
- Tip:
Letting the plant flower and set seed — once it bolts, leaf growth stops and what's left is tough and bitter.
Use, store and save seed
Spider-plant leaf spoils very fast, so use it the day you pick it, or blanch and dry it for storage. Blanching means dipping the leaf briefly in boiling water — it also cuts the bitterness — after which you sun-dry it to keep for the dry season. To get next year's seed, let a few of your strongest plants flower and run to seed; the slender pods dry and split open on their own (shatter), flinging the seed out, so watch them and pick just as they turn brown, before they burst. Store that seed dry for six months or more — the rest of its 'sleep' finishes in the store, so it sprouts far better next season.
Pests and diseases that attack spider plant


Grow spider plant with a plan, not a guess
This guide is the general answer. Divisi works out yours — the week to plant spider plant on your soil and your rainfall, and each job dated for your field.


When to plant spider plant, country by country
- When to plant spider plant in Algeria
- When to plant spider plant in Angola
- When to plant spider plant in Benin
- When to plant spider plant in Botswana
- When to plant spider plant in Burkina Faso
- When to plant spider plant in Burundi
- When to plant spider plant in Cabo Verde
- When to plant spider plant in Cameroon
- When to plant spider plant in Comores
- When to plant spider plant in Congo
- When to plant spider plant in Côte d'Ivoire
- When to plant spider plant in Egypt
- When to plant spider plant in Eritrea
- When to plant spider plant in Eswatini
- When to plant spider plant in Ethiopia
- When to plant spider plant in Gabon
- When to plant spider plant in Gambia
- When to plant spider plant in Ghana
- When to plant spider plant in Guinea Ecuatorial
- When to plant spider plant in Guinea-Bissau
- When to plant spider plant in Guinée
- When to plant spider plant in Kenya
- When to plant spider plant in Lesotho
- When to plant spider plant in Liberia
- When to plant spider plant in Libya
- When to plant spider plant in Madagascar
- When to plant spider plant in Malawi
- When to plant spider plant in Mali
- When to plant spider plant in Mauritanie
- When to plant spider plant in Mauritius
- When to plant spider plant in Morocco
- When to plant spider plant in Moçambique
- When to plant spider plant in Namibia
- When to plant spider plant in Niger
- When to plant spider plant in Nigeria
- When to plant spider plant in Rwanda
- When to plant spider plant in République centrafricaine
- When to plant spider plant in République démocratique du Congo
- When to plant spider plant in Sao Tome and Principe
- When to plant spider plant in Seychelles
- When to plant spider plant in Sierra Leone
- When to plant spider plant in Somalia
- When to plant spider plant in South Africa
- When to plant spider plant in South Sudan
- When to plant spider plant in Sudan
- When to plant spider plant in Sénégal
- When to plant spider plant in Tchad
- When to plant spider plant in Togo
- When to plant spider plant in Tunisie
- When to plant spider plant in Uganda
- When to plant spider plant in United Republic of Tanzania
- When to plant spider plant in Zambia
- When to plant spider plant in Zimbabwe
Where spider plant scores best
Districts where Divisi's engine currently rates this crop highest, ranked by fit.
-
 Ibeno
Ibeno -
 Malabo
 -
 Madimba
 -
 Zorzor
 -
 Okoyo
Okoyo -
 Méagui
 -
 Kinango
 -
 Gamamudo/Ganadu
 -
 Nola
Nola -
 Mefou-et-Afamba
 -
 Morobo
 -
 Ilu Aba Bora
Get Insights by email
A short digest of new Divisi articles. No email on quiet weeks.
Frequently asked questions
How do I grow spider plant?
How to grow spider plant: 60–90 days to maturity, 30 cm rows, 0.5–1 cm deep. Also called cat's whiskers, chinsaga, saget, mwianzo, jjobyo, tsisaka, dek.
What is chinsaga in English?
Chinsaga is the Gusii name for spider plant.
What is saget in English?
Saget is the Kalenjin name for spider plant.
What is mwianzo in English?
Mwianzo is the Kamba name for spider plant.
What is jjobyo in English?
Jjobyo is the Luganda name for spider plant.
What is tsisaka in English?
Tsisaka is the Luhya name for spider plant.
What is dek in English?
Dek is the Luo name for spider plant.
What is munyevhe in English?
Munyevhe is the Shona name for spider plant.
What is yobyu in English?
Yobyu is the Soga name for spider plant.
What is mgagani in English?
Mgagani is the Swahili name for spider plant.
How long does spider plant take to grow?
Spider plant takes about 60–90 days from sowing to maturity, though the exact length varies with variety, temperature and how the season runs.
What spacing should I use for spider plant?
Space spider plant rows about 30 cm apart, with roughly 12 cm between plants within the row.
How deep should spider plant be planted?
Sow spider plant at about 0.5–1 cm deep. Shallower risks drying out; deeper wastes seed energy before the shoot reaches light.
What pests and diseases attack spider plant?
The ones covered in this guide are Bagrada bug, Cabbage aphid. Each has its own page explaining how to identify, check for and control it.