 Divisi
How to grow enset
Ensete ventricosum · Musaceae
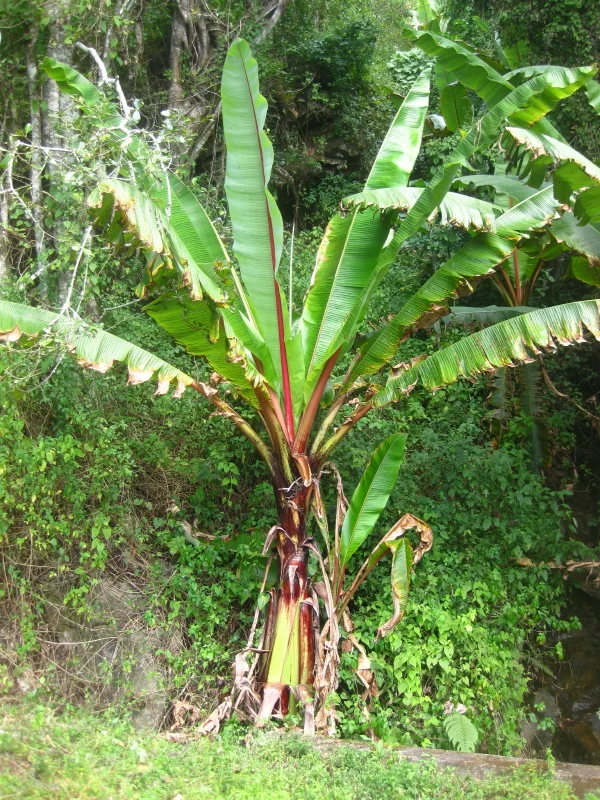
Photo: Ton Rulkens · CC BY-SA 2.0
Enset — the 'false banana' or 'tree against hunger' — is a giant highland cousin of the banana, and the everyday food of around 20 million people in the cool Ethiopian highlands. It looks like a banana plant, but you grow it and eat it in a completely different way. You do not plant seed, and you do not eat the fruit (it is useless). Instead you multiply it from suckers — young shoots that grow from the base of a healthy plant — then grow it patiently for several years. What you harvest is the starch packed into its thick trunk (the pseudostem, a tight bundle of leaf-sheaths) and its underground bulb (the corm). Enset flowers only once, at the very end of its life, and then dies — so you fell it just before it flowers, when the starch is at its peak. The scraped trunk and grated corm are pounded to a mash and fermented in a leaf-lined pit into kocho, a starchy bread that keeps for months or even years: a living food-bank beside the house.
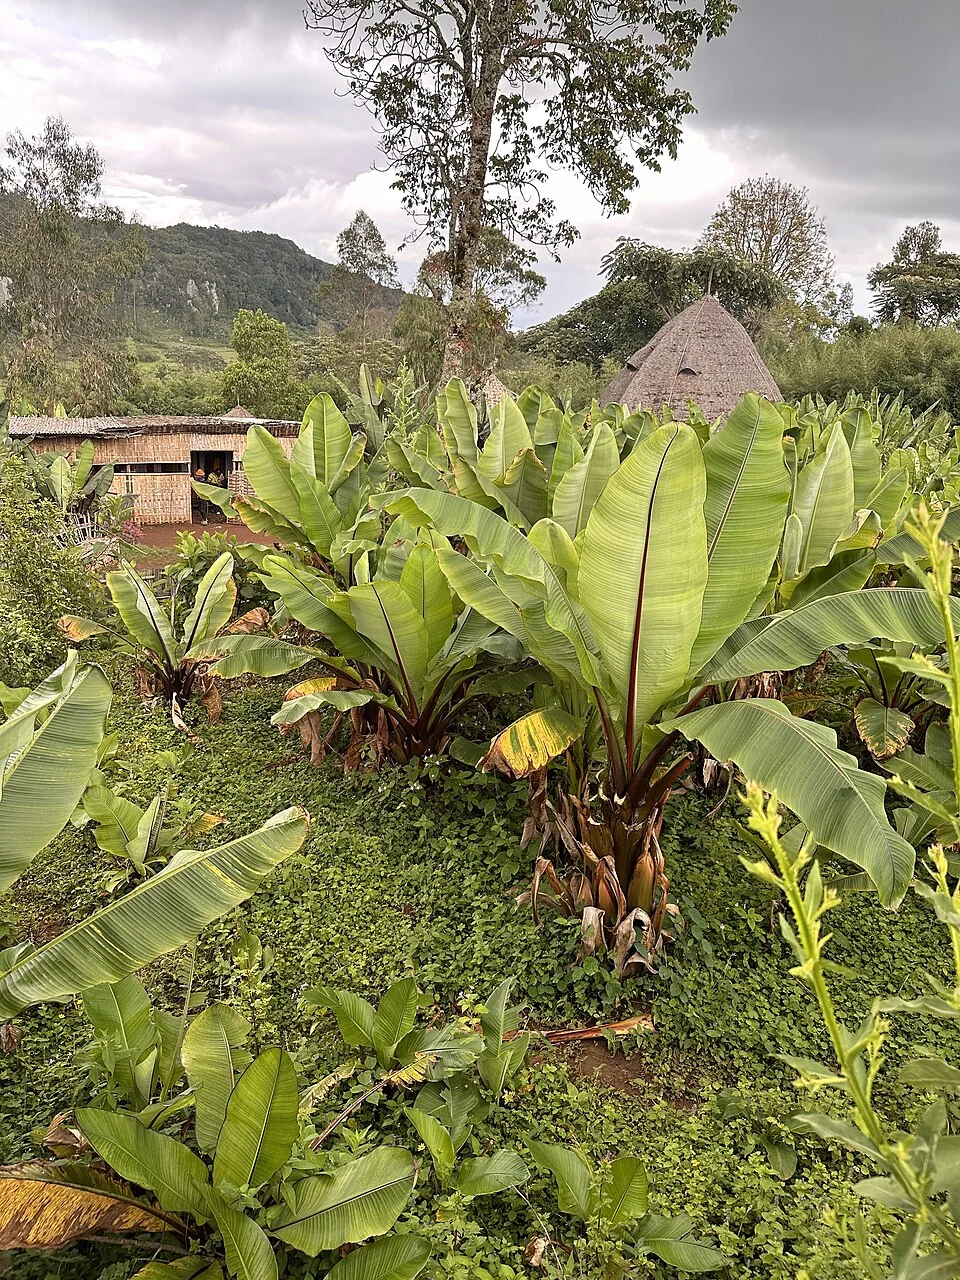
DrFO.Tn · CC BY 4.0 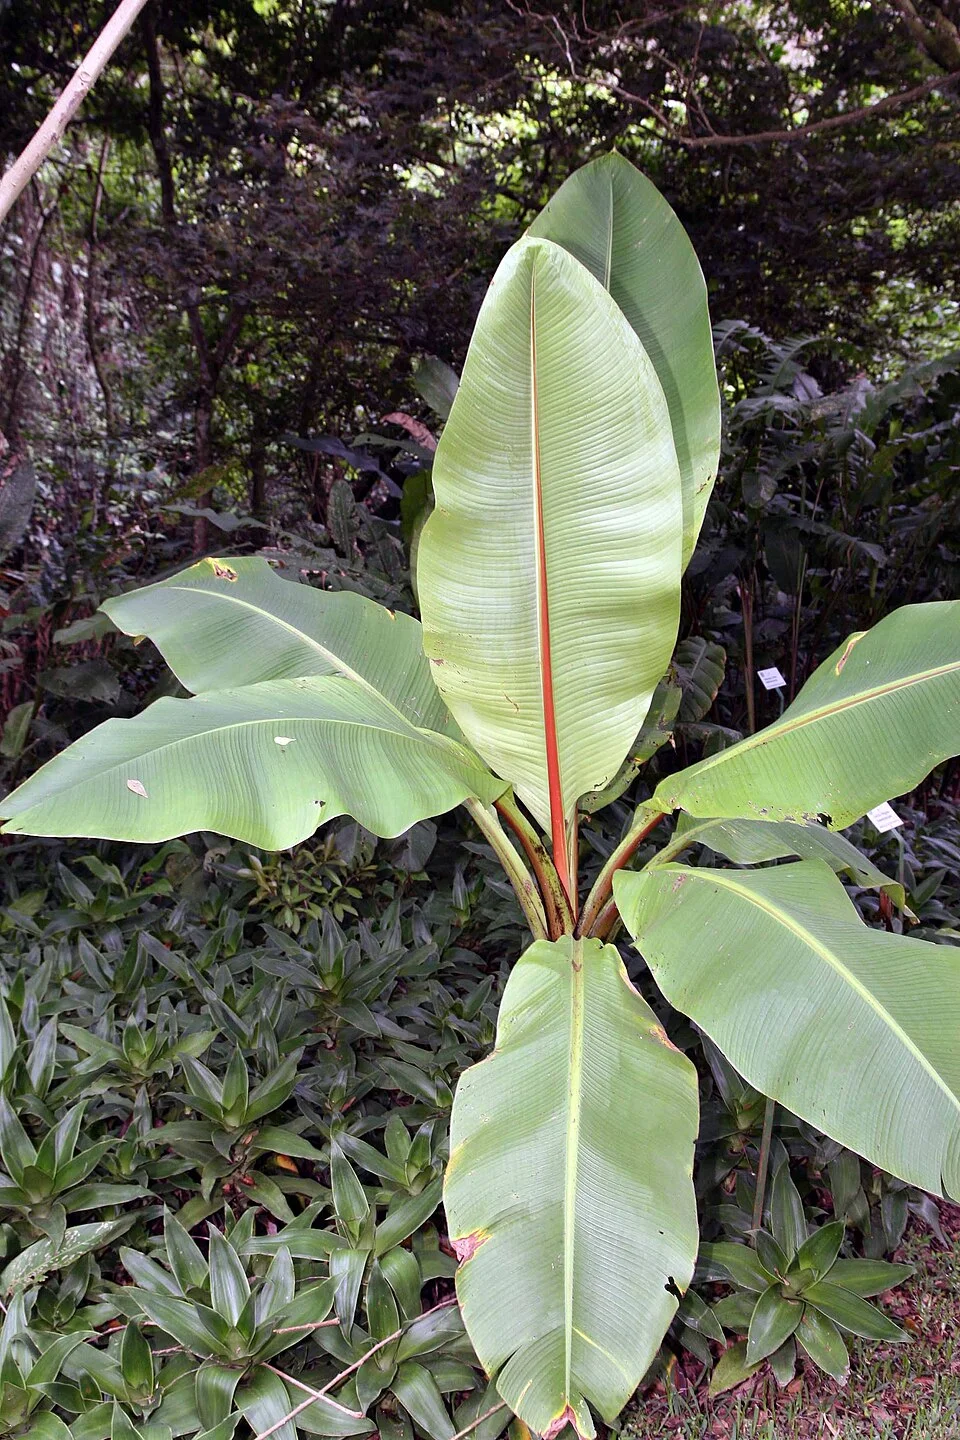
Photo by David J. Stang · CC BY-SA 4.0
- Days to maturity
- 1095–2555 days
- Row spacing
- 200 cm
- Plant spacing in the row
- 200 cm
These are general figures for the crop, compiled from published agronomic references including FAO and CABI. The right choice for your field depends on your soil, rainfall and the yield you are aiming for.
Will enset actually do well on your field? Check your own field against every crop in the catalogue — no signup. Run the crop check →
Also known as
Enset is also called false banana and tree against hunger.
- English
- false banana, tree against hunger
- Amharic
- enset, ensete, kocho
- Gujarati
- warqe
Working in buckets, bags or paces? The farming glossary turns the measures growers actually use into kilograms and hectares — what a 20 litre bucket of each crop really weighs, and how to size a field by walking it — alongside the Shona, Swahili, Ndebele and Yoruba words used in the field. Open the glossary →
Growing enset, stage by stage
Your enset garden, year by year — take clean suckers from one healthy mother plant, step them up through several years of transplanting and heavy feeding, keep a clean blade against wilt, then fell a full-grown plant and ferment it into kocho that stores for years.
Get ready: pick a clean mother plant and a rich, well-drained garden
Almost everything about your enset garden is decided by two choices you make before you start: which plant your suckers come from, and which ground you plant them in. Enset lives in your garden for years, so a disease-carrying sucker or a wet, hungry site is a mistake you carry for years too. The one disease that matters most — Xanthomonas wilt, a bacterial sickness that blocks the plant's water pipes — has no cure. Your only defence is to start clean: a healthy mother, a clean knife, and deep, well-fed, well-drained soil.
Select a wilt-free mother plant & prepare a manured, drained garden Critical
Every plant in your garden will come from this one mother, and will live for years in this one patch of ground. Choose a wilt-sick mother and you plant the disease with your own hands — and it never leaves. Choose a wet or hungry site and the plants stall and the corms stay small. Getting these two right, in the couple of months before you start, sets up the whole garden.
Walk your own and trusted neighbours' gardens and mark the biggest, healthiest plant you can find — deep-green leaves, strong growth, no yellowing or wilting. You will take your suckers from a plant like this. (A sucker is a young shoot that grows from the base of a parent plant; enset is grown from these, never from seed.)
Before you trust any plant, check it for wilt — the one disease that can ruin everything. Look for leaves that yellow and wilt for no dry-season reason, and a wilting or blackening flower bud. The sure test: cut into the trunk and look for a yellow, sticky ooze. Never take material from such a plant, or from its close neighbours. (Xanthomonas wilt is a bacterial sickness that blocks the plant's water pipes; it has no cure.)
Pick your ground: deep, rich soil close to the house, so you can keep carrying manure to it for years. Enset roots reach down about a metre and feed heavily their whole life.
Make sure the site is well-drained — gently sloping, or raised into mounds — so water never sits after rain. Enset rots in waterlogged ground. Most cool highland soil suits it well; it likes soil that is slightly sour to neutral, so no lime is needed.
Load the ground with organic matter now: dig in all the well-rotted manure, compost and household refuse you can gather. Enset is one of the hungriest crops there is, and a rich start pays back for years.
Set aside one knife just for enset. Pass its blade through fire, or dip it in a bleach solution, before every cut. The wilt travels from plant to plant on a dirty blade — a clean tool is your main defence. Keep the bleach off your food and skin, and wash your hands after.
- Do:
Choose the biggest, most vigorous mother you can find — a strong, healthy mother throws more and stronger suckers, and carries no hidden disease into your garden.
- Tip:
Bringing in suckers from a garden you don't know. Cheap or free planting material is the commonest way wilt arrives — and once it is in your soil and on your tools, it stays for good.
- Watch out:
Any plant oozing yellow, sticky sap from a cut trunk, or with a wilting or blackening flower bud — that is wilt. Don't touch it, and keep your clean knife well away from it.
Multiply your suckers and step them up, bed by bed
Enset is not sown — it is multiplied. You fell a healthy mother, kill its single growing point, and the corm answers by throwing up a cluster of suckers. You then nurse those young plants through 2 to 4 moves into ever-wider, ever-richer beds over 1 to 4 years. This staged spacing and heavy feeding is exactly what builds a giant plant from a small shoot. Keep a clean blade at every step, and pull out the first wilt-sick plant you ever see — there is no cure.
Decapitate corm + kill meristem to release suckers Critical
One healthy corm can give you 4-7 new plants — or up to 20-100 if you split it — but only if you kill its single growing point. Left alone, a corm makes one trunk. Kill that growing point and it wakes up its side-buds instead, throwing a whole cluster of suckers. This is how you turn one clean mother into a garden without ever buying seed, in the first month or two after you start.
Take a healthy, wilt-free mother — anything from about 6 months to a few years old — and cut the whole plant down to ground level. (The corm is the fat underground bulb the plant grows from.)
Kill the central growing point. The corm has one soft bud in the middle that makes the single trunk. Scoop or bore it out — about a finger-joint deep and wide (roughly 5 cm). Removing it forces the corm to sprout side-suckers instead. (That central bud is the meristem — the plant's main growing point.)
To get many more plants, split the corm. Cut a clean corm in half or in quarters through the middle before you bury it — each clean, skin-covered piece can throw its own suckers. This is how farmers get 20-100 shoots from one plant.
Bury the corm shallow, cut-side up, with only a thin cover of soil so its top sits just below the surface. Firm the soil around it.
Dip the corm and any lifted suckers in hot water before you plant them, to kill root mealybug hiding on them — tiny white, waxy, powdery insects that feed on the roots and slowly starve the plant.
Wait about 3 weeks. Suckers push up in roughly three weeks — 4-7 from a whole corm. Let them grow on a little before you lift them for their first move.
If nothing sprouts after 3-4 weeks, or a single trunk grows back instead of a cluster → you left the growing point in. Scoop out the regrown central bud again, and wait once more.
- Do:
Hot-water dip your planting material before planting. It kills root mealybug — tiny white, waxy, powdery insects that hide on the roots and corm base, feeding on the sap so the plant yellows, wilts and stays small.
- Tip:
Leaving any of the central growing point behind. If the meristem survives, the corm just makes one trunk again instead of a cluster of suckers, and you get almost nothing.
- Watch out:
Only ever work from a healthy mother. Clean planting material also keeps out root nematodes — tiny soil worms that leave patches of stunted, wilting plants with knotted, galled or rotting roots when you lift them — because these pests ride into new ground on infested suckers.
Transplant successively (2–4×) Critical
A tiny sucker, crowded among its siblings, can never grow into a giant plant. Once a year, for the next 2-4 years, you lift the young plants and replant them into a wider, richer bed — giving the roots and corm more room and more food to swell each time. Skip these moves and you end up with many small plants instead of a few huge ones.
First move (about a year in): once the suckers are well rooted, lift them with a clean blade and set them into a well-manured nursery bed, spaced more widely than before.
Step up each year: at each move — 2 to 4 times over the years — replant into a wider, more heavily manured bed. Each step roughly doubles the room and the food per plant.
Final move to the field: plant the 2-4-year-old suckers where they will grow to full size. Give each one a full two strides (about 2 m) of room each way — that works out to roughly 1,000-2,000 grown plants to a hectare. A full-grown enset is huge, and this spacing is permanent, so give them the room now.
Feed at every move: dig plenty of well-rotted manure into each new bed before you replant. This staged, repeated feeding is what builds the plant's bulk.
Clean your blade every single time, and never carry soil, suckers or an un-cleaned knife from any garden where a plant has wilted.
Rogue on the first wilt sign: if any plant shows yellowing, wilting, or a yellow ooze from a cut, dig it out whole and destroy it on the spot — don't move its soil or your tools to healthy plants. There is no cure, so removing the sick plant is the only 'treatment'. (To rogue means to pull out and destroy a diseased plant so it can't infect the rest.)
- Do:
Give the final plants a full two strides (about 2 m) each way. A grown enset spreads very wide; crowded plants shade and starve each other and stay small.
- Tip:
Moving soil, suckers or an un-cleaned knife from any garden that has ever had wilt. That is exactly how the disease travels onto clean ground.
- Watch out:
The first plant to yellow, wilt, or ooze yellow sap from a cut. Pull it and destroy it the same day — waiting even a few days lets it spread to the whole garden.
Disinfect tools each handling Critical
Xanthomonas wilt has no medicine. It rides from a sick plant to a healthy one on the blade of your knife. A few seconds cleaning your tools between plants is the cheapest, surest defence you have — miss it once and you can plant the disease with your own hand. Make it a standing habit at every handling, right through the years of nursery and transplanting work.
Keep one knife for enset only, and clean its blade before every cut and between every plant — not just when you can see disease.
Fire method: pass the blade through a flame until it is hot. Bleach method: dip or wipe the blade in a bleach solution — about one cup of bleach in ten cups of water (roughly one part in ten) — or in strong local spirit, and let it sit a few seconds.
After touching any suspect plant, clean the blade before you touch a healthy one, and clean your hands and hoe too, so you don't carry the disease on them.
Don't carry soil from plant to plant on your tools or feet, and keep your enset knife away from any neighbour's garden.
- Do:
Clean the blade at every cut, even on plants that look healthy — a plant can carry wilt inside before any symptom shows on the outside.
- Tip:
Using the household knife on enset and then on food, or sharing tools with another garden. The wilt spreads on shared, uncleaned blades.
- Watch out:
A bleach dip loses its strength through the day — mix a fresh batch each working morning, keep it off your food and skin, and wash your hands after.
The long grow: feed it heavily and keep it clean, year after year
Now comes the patience. For several years the plant quietly piles starch into its swelling trunk (the pseudostem, its bundle of leaf-sheaths) and its underground bulb (the corm) — the very parts you will eat. Two jobs keep it building: feed it heavily and often, and walk the garden regularly to catch wilt and pull out sick plants before they spread. And guard those fat corms from the animals that love to dig them up.
Maintain heavy manuring Critical
Enset is one of the hungriest plants a smallholder grows, and it feeds for years, not one season. Every basket of manure you dig in turns into more starch in the trunk and corm — the food you will harvest. Starve it and the plant stalls and the corm stays small. Feed it once or twice a year, right through the growing years.
Feed at least once or twice a year, right through all the growing years — spread a heavy dressing of well-rotted manure or compost around each plant.
Be generous: about a full basket or wheelbarrow-load of rotted manure in a ring around each big plant. Enset can take all the manure and kitchen refuse you can gather — this is why it is planted right by the house and the cattle pen.
Add wood ash for strength: sprinkle a few handfuls of clean wood ash around each plant too. Enset is very hungry for potash (potassium — the food that thickens and strengthens the trunk and corm), and ash from the cooking fire is a free, local source.
Spread it in a wide ring, out towards the leaf-tips where the feeding roots are, and keep it off the trunk base so it doesn't rot the stem.
Use only well-rotted, dark, crumbly manure. Fresh dung burns the roots and brings in weed seeds.
Wash your hands after handling manure and ash.
- Do:
Plant your enset close to the house and the cattle pen, so manure, ash and kitchen refuse are always to hand — heavy feeding is exactly why enset yields so well.
- Tip:
Piling fresh, raw manure against the trunk. It scorches the roots and can rot the stem base — always use well-rotted manure, spread in a ring away from the stem.
- Watch out:
Signs of mole-rats, porcupines and wild pigs at the corms — fresh diggings, holes, tunnels and gnawed corms around the plants. Fence, trap or fill in burrows wherever they are working.
Scout wilt + rogue Critical
Wilt, corm rot and digging animals all work quietly until a plant is beyond saving. A slow walk through the garden every month or so lets you catch a sick plant and pull it out before it infects its neighbours. With Xanthomonas wilt, which has no cure, roguing — pulling and destroying the sick plant — is your only medicine.
Walk the whole garden every month or so, looking over every plant from the leaf-tips down to the base.
Wilt signs: leaves that yellow and wilt for no dry-season reason, a wilting or blackening flower bud, and the sure test — cut into a suspect trunk and look for a yellow, sticky ooze.
Corm-rot signs: young or newly-moved plants that yellow, wilt and topple over, with a soft, wet, foul-smelling brown-to-black rot at the base — the rotten corm can no longer hold the plant up. This is worst in wet, poorly-drained spots.
Rogue at once: dig out any wilt- or rot-sick plant with its whole corm and destroy it — burn it, or bury it deep — on the spot. Clean your blade, and don't carry its soil to healthy plants.
Animal signs: fresh diggings, holes, tunnels or gnawed corms mean mole-rats, porcupines or wild pigs — fence, trap or fill the burrows where they are working.
Keep water moving: make sure no plant sits in a wet hollow. Open a drain in low spots — standing water both rots corms and stresses the plant. If you find wilt already in several plants, rogue the worst, protect the clean ones, and move no material out of the garden.
- Do:
Pull and destroy the very first wilt-sick plant the day you spot it. Sacrificing one plant early saves the whole stand.
- Tip:
Composting sick plants, feeding them to animals, or leaving a rogued plant lying in the garden. Burn it or bury it deep, well away from healthy plants.
- Watch out:
Wet, low spots after rain — standing water rots corms and spreads soft rot. Drain them; a well-drained garden is your best protection against corm rot.
Harvest at its peak — just as it readies to flower
Enset stores the most starch right before it flowers, usually in years 4-7. The plant tells you it is ready: a flower stalk starts to push up from the centre (the inflorescence — the plant's one and only flowering), the trunk is fat and heavy, and the corm is full. Harvest then. Wait too long and the plant spends that stored starch making its flower and seed, and then dies — so you lose the very food you grew. To harvest, fell the plant, scrape the starch from the trunk sheaths, and grate the corm.
Turn it into kocho: scrape, pack and ferment
The harvest isn't food yet — it's raw starch that must be fermented. You scrape the trunk and grate the corm into a wet mash, pack it into a leaf-lined pit, and let it ferment underground for weeks to months. Done well, the result — kocho — keeps for months or even years: the 'tree against hunger' food-store that carries a family through the lean season.
Pit-ferment the scraped mash into kocho Critical
Raw enset starch is not edible and will not keep. Fermenting it in a pit makes it safe and good to eat and turns it into a store that lasts months or years — the whole reason enset is a hunger-buffer. Do this in the weeks right after you fell a mature plant; a rushed or dirty pit wastes years of growing.
Scrape and grate. With the plant felled, scrape the soft white starchy pulp from the inside of the trunk sheaths (this scraping is called decorticating), and grate or pound the corm to a pulp.
Knead into a mash. Mix the scraped trunk pulp and the grated corm together into a wet, even mash.
Line a pit. Dig a pit about 1 m deep — up to your waist — and line it fully with fresh enset leaves so the mash never touches bare soil.
Pack and cover. Press the mash firmly into the leaf-lined pit, cover it over with more enset leaves, and weigh it down. Keep out rain and soil.
Ferment. Leave it to ferment for 2-3 weeks for a quick batch, and up to several months or even years for the best-keeping kocho. It sinks and sours as it works.
Take your products. Squeeze off the liquid starch concentrate for bulla (a fine, prized starch); the fermented mash itself is kocho (a starchy bread baked on a griddle); and whole corms can simply be boiled to eat as amicho.
If the pit smells of foul rot rather than a clean sour, or rain has got in and waterlogged it → that batch has spoiled; don't eat it. Re-dig and re-line the next pit, and keep it tightly covered, weighted and rain-free.
- Do:
Line the pit well with fresh leaves and keep it firmly covered. Clean, well-packed kocho stores for months to years — it is the food reserve that gives enset its name, 'the tree against hunger'.
- Tip:
Letting rain or soil into the pit. A dirty or waterlogged pit rots the batch instead of fermenting it cleanly, and the whole harvest is spoiled.
- Watch out:
Squeeze off and keep the liquid starch (bulla) as you pack — it is the finest product and easy to lose if you don't collect it.
Pests and diseases that attack enset


Where to sell enset
Markets that trade this crop — what each one sells it by, when supply peaks there, and the currency used.


Grow enset with a plan, not a guess
This guide is the general answer. Divisi works out yours — the week to plant enset on your soil and your rainfall, and each job dated for your field.


When to plant enset, country by country
- When to plant enset in Algeria
- When to plant enset in Angola
- When to plant enset in Burundi
- When to plant enset in Cabo Verde
- When to plant enset in Cameroon
- When to plant enset in Comores
- When to plant enset in Egypt
- When to plant enset in Eritrea
- When to plant enset in Eswatini
- When to plant enset in Ethiopia
- When to plant enset in Guinea Ecuatorial
- When to plant enset in Kenya
- When to plant enset in Libya
- When to plant enset in Madagascar
- When to plant enset in Malawi
- When to plant enset in Mauritius
- When to plant enset in Morocco
- When to plant enset in Moçambique
- When to plant enset in Namibia
- When to plant enset in Nigeria
- When to plant enset in Rwanda
- When to plant enset in République démocratique du Congo
- When to plant enset in Sao Tome and Principe
- When to plant enset in Somalia
- When to plant enset in South Africa
- When to plant enset in South Sudan
- When to plant enset in Sudan
- When to plant enset in Tunisie
- When to plant enset in Uganda
- When to plant enset in United Republic of Tanzania
- When to plant enset in Zambia
- When to plant enset in Zimbabwe
Where enset scores best
Districts where Divisi's engine currently rates this crop highest, ranked by fit.
-
 Nyarugenge
 -
 Songa
Songa -
 Pokot South
 -
 Mussende
 -
 Moshi
Moshi -
 Ambositra
 -
 Lubero
 -
 Majang
 -
 San Antonio de Palé
 -
 Sironko
 -
 O.R.Tambo
 -
 Negage
Get Insights by email
A short digest of new Divisi articles. No email on quiet weeks.
Frequently asked questions
How do I grow enset?
How to grow enset: 1095–2555 days to maturity, 200 cm rows. Also called false banana, ensete, warqe.
What is enset in English?
Enset (also ensete and kocho) is the Amharic name for enset.
What is warqe in English?
Warqe is the Gujarati name for enset.
How long does enset take to grow?
Enset takes about 1095–2555 days from sowing to maturity, though the exact length varies with variety, temperature and how the season runs.
What spacing should I use for enset?
Space enset rows about 200 cm apart, with roughly 200 cm between plants within the row.
What pests and diseases attack enset?
The ones covered in this guide are Banana Xanthomonas wilt, Corm rot, Enset root mealybug. Each has its own page explaining how to identify, check for and control it.