 Divisi
How to grow cocoa
Theobroma cacao · Malvaceae
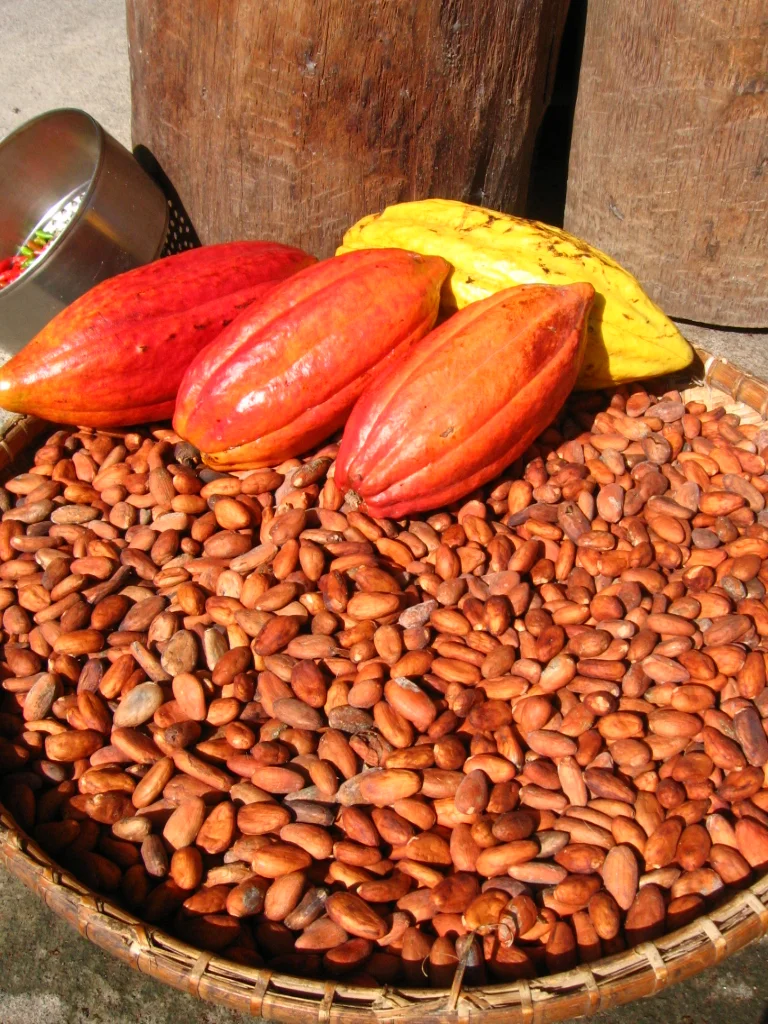
Photo: Lolay · CC BY 2.0
Cocoa (Theobroma cacao) is a small evergreen tree of the hot, wet tropics. Left alone it grows tall, but you keep it pruned to about 3–5 m — a little taller than a person — so you can still reach the pods. It grew up in the shade under the rainforest, so when young it must have shade: full sun scorches the leaves and stalls or kills the tree. Its oddest habit is that the flowers and pods grow straight out of the trunk and the thick old branches, not on the leafy twigs. The tiny waxy flowers are pollinated only by midges — little flies smaller than a mosquito — that breed in damp leaf litter on the ground, and only a few flowers ever set into pods, so keeping the midges happy is half the crop. From flower to ripe pod takes about five to six months, and because the tree flowers on and off all year you pick in rounds, not one big harvest. The beans inside become chocolate — but only after you ferment and dry them properly. Planted once, a cocoa tree bears for decades.
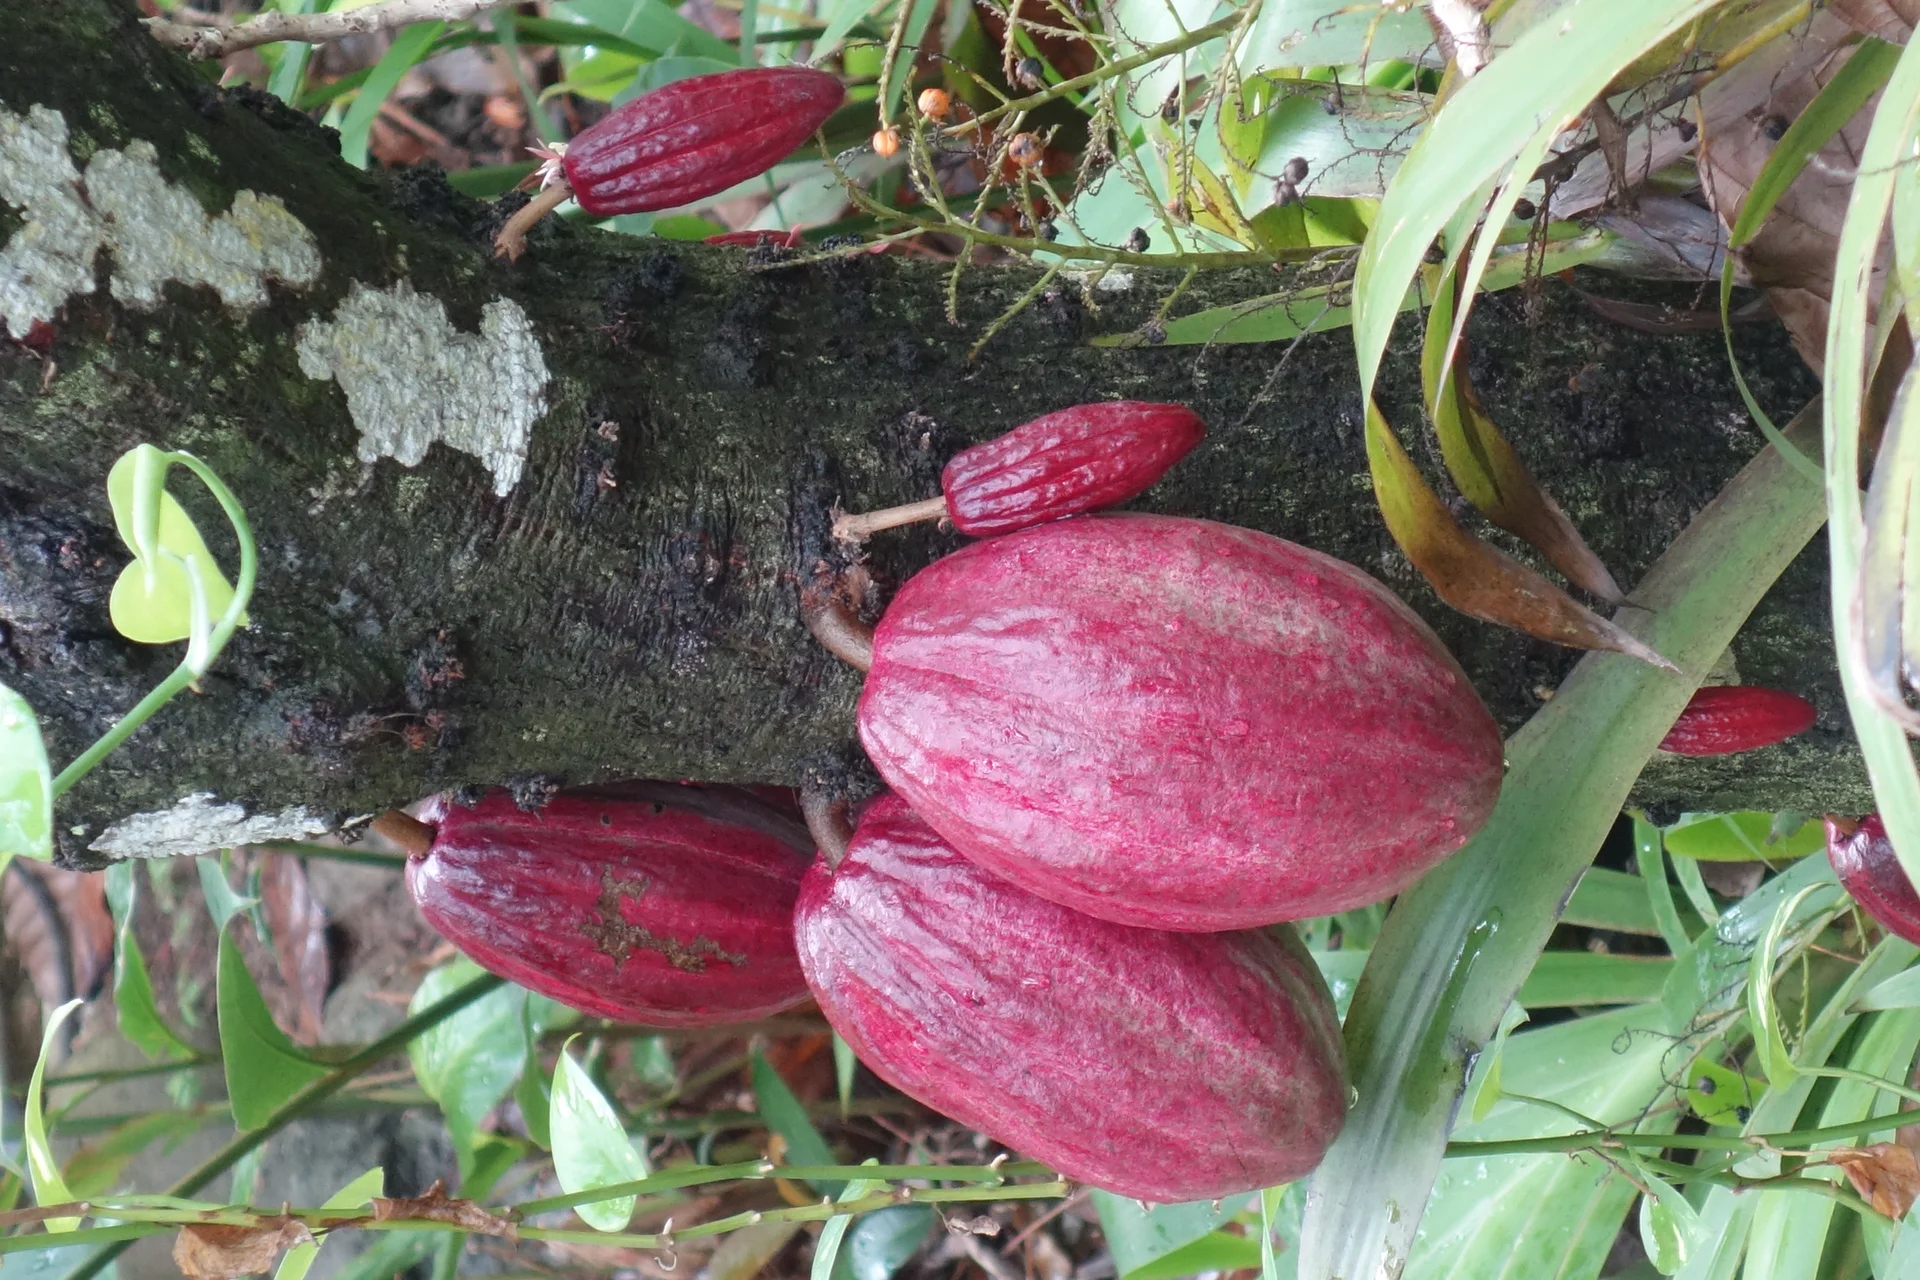
Pkraemer · CC BY-SA 4.0 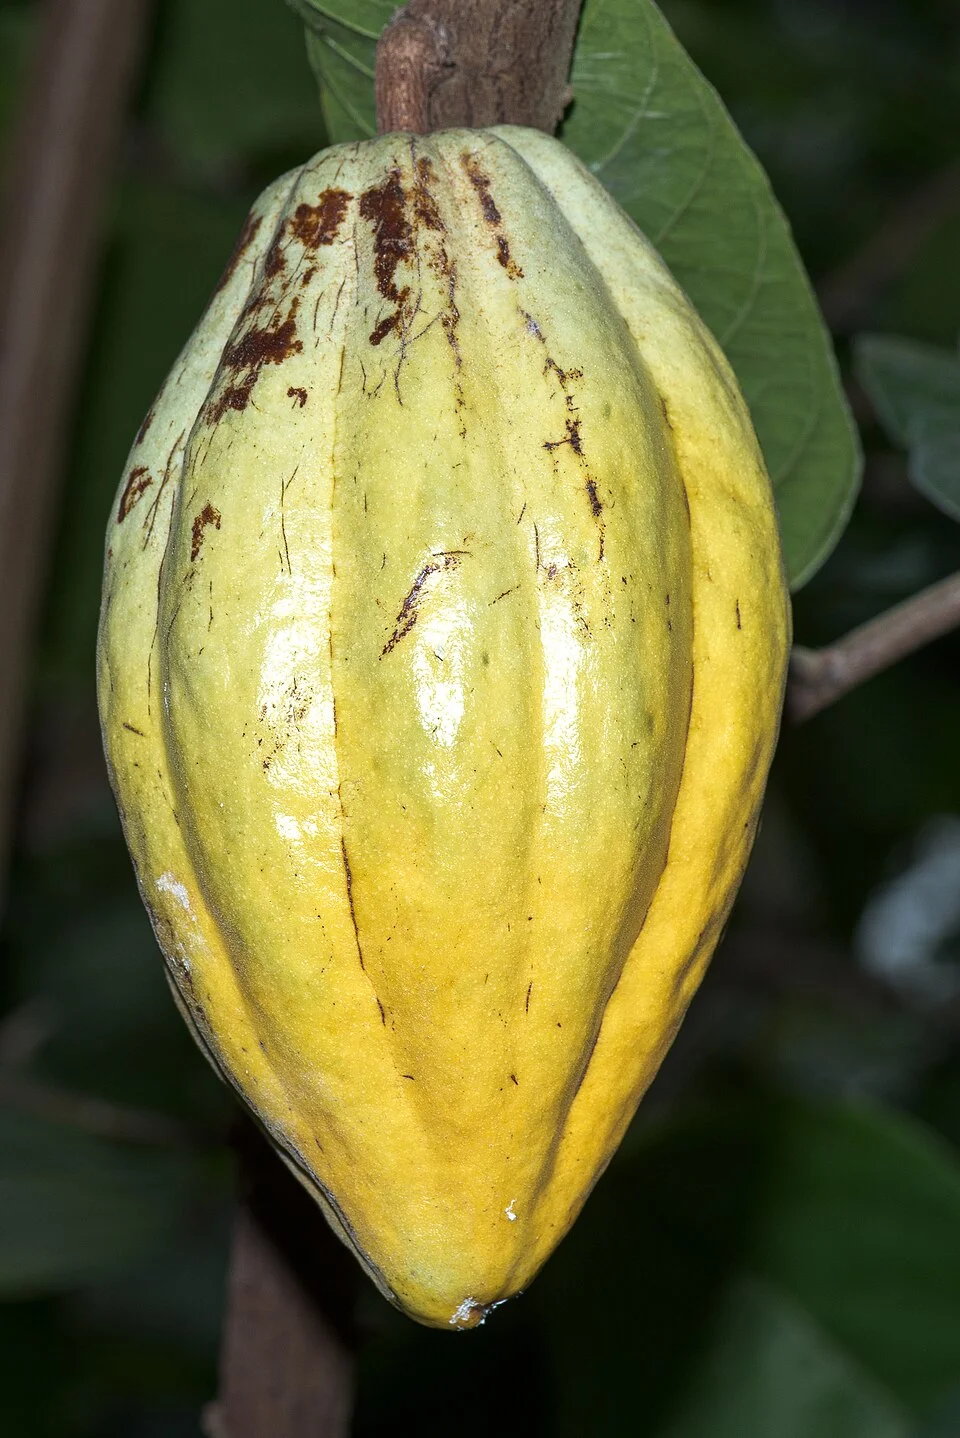
Flocci Nivis · CC BY 4.0
- Days to maturity
- 150–180 days
- Row spacing
- 300 cm
- Plant spacing in the row
- 300 cm
These are general figures for the crop, compiled from published agronomic references including FAO and CABI. The right choice for your field depends on your soil, rainfall and the yield you are aiming for.
Will cocoa actually do well on your field? Check your own field against every crop in the catalogue — no signup. Run the crop check →
Also known as
Cocoa is also called cacao.
- English
- cacao
- French
- cacao, cacaoyer
- Portuguese
- cacau
- Swahili
- kakao
Working in buckets, bags or paces? The farming glossary turns the measures growers actually use into kilograms and hectares — what a 20 litre bucket of each crop really weighs, and how to size a field by walking it — alongside the Shona, Swahili, Ndebele and Yoruba words used in the field. Open the glossary →
Growing cocoa, stage by stage
Your cocoa orchard from the ground up — raise shaded young trees and plant them out, nurse them to first flowering, then work the year-round rounds of pollination, pod care, weekly picking, and the fermenting and drying that make the flavour and the price.
Raise your young trees and set up the shade
Cocoa is a shade tree you plant once and pick from for decades, so the slow start is worth doing well. In the months before planting, two big jobs run side by side: raise strong young plants in a shaded nursery, and get the field's shade already standing — because bare, sunny ground scorches a young cocoa tree. Get both right and the trees settle in fast; rush them and you replant.
Raise seedlings/grafts under shade Critical
A cocoa tree lives and bears for decades, so it pays to start it from strong, healthy young plants. Young cocoa cannot take full sun — raised in the open it yellows, scorches and dies. About six months growing under shade in a nursery gives you sturdy, knee-high plants ready to survive the move to the field.
Start your beans in the nursery about six months before you plan to plant out — count back from the start of your rains, so the plants are ready the moment the ground is moist enough to plant.
You have two ways to get plants: grow from seed, or set out a grafted plant (a shoot cut from a chosen good tree and joined onto a young rootstock — it can bear sooner). If you grow from seed, take beans only from a healthy, heavy-bearing tree, and sow them fresh — cocoa seed dies within a few days of leaving the pod, so it cannot be dried and kept like grain.
Fill planting bags (or a raised nursery bed) with good topsoil mixed with well-rotted manure or compost. Push one bean in on its side, about a finger-joint deep (3–5 cm) — no deeper.
Build a shade roof over the nursery — palm fronds, grass, or shade netting on a simple frame — so the seedlings get soft, broken light and never full sun. Aim for about half shade.
Water gently and often to keep the soil moist but never swampy — cocoa seedlings hate both drying out and sitting in water. Keep the bags weed-free.
In the last few weeks, open the shade a little at a time to harden the plants to brighter light. Plant out when they are about knee-high (≈45 cm) with several firm, dark-green leaves.
- Do:
Sow cocoa beans fresh from a just-opened pod — a bean left to dry for even a few days usually will not grow.
- Tip:
Full sun on the nursery — young cocoa leaves scorch and the plants stall or die.
- Watch out:
Damping-off — seedlings that suddenly flop over and rot at the soil line in wet, crowded beds. Thin them out, ease off the watering, and open up the airflow.
Establish temporary + permanent shade Critical
Young cocoa planted onto bare, sunny ground cooks — the leaves scorch and the tree may never recover. Shade also traps the moist, humid air cocoa needs. Because shade trees take time to grow, you must have them standing before the cocoa goes in, not planted after.
In the six months before you plant out, choose a deep, fertile, moist but well-drained site, sheltered from strong wind — a gentle valley, or near (not in) a stream, is ideal. Cocoa hates both drought and standing water.
Plant your temporary shade first: fast-growing banana or plantain among the future cocoa positions. They throw shade within months and feed your family while the cocoa is still years from bearing.
Plant permanent shade trees too — scattered taller trees, ideally nitrogen-fixing kinds such as Gliricidia or Albizia, which shade the cocoa and feed the soil at the same time. Space them so, once grown, they cast light, broken shade, not deep gloom.
Set all this up months ahead, so the temporary shade is already casting shade on the day you plant the cocoa. Clear ground weeds along the planting lines, but keep the canopy overhead.
- Do:
Use banana or plantain for quick temporary shade — it protects the young cocoa and feeds your family through the years before the cocoa bears.
- Tip:
A windy, exposed or waterlogged site — wind tears cocoa's big leaves and dries the air, and standing water rots the roots.
- Watch out:
Too much permanent shade later on — deep shade cuts your pod yield. You will thin it back to about a third-to-a-half open once the trees are established.
Plant under shade and settle the trees in
The young trees go out under the shade you prepared, at three strides apart each way (3×3 m, about 1,100 trees per hectare) — a spacing you are fixed with for the whole life of the orchard, so get it right. Then, right through the first year after planting, the job is simple but constant: keep every tree moist, mulched, weed-free and watched so it lives and roots down.
Plant under shade + mulch Critical
The spacing you set now is permanent — these trees stand for decades — so plant them evenly, at the right distance, under real shade. A well-mulched, well-watered young tree roots down fast; a dry, exposed one stalls or dies and leaves a costly gap you cannot easily fill.
Plant at the start of the rains, into moist ground and under the temporary and permanent shade you set up earlier.
Space the trees three strides apart each way — about 3 m × 3 m, roughly 1,100 trees per hectare (a stride is one big step, about 1 m). Don't crowd them: cocoa branches out wide, and this spacing is fixed for the life of the orchard.
Dig a hole a little wider and deeper than the plant's bag. If it is in a bag, slit and slide the bag off without breaking the ball of soil, and set the plant so its soil surface sits level with the ground — not deeper.
Firm the soil gently around it and water it in well.
Mulch heavily all around the young tree — a thick blanket of grass, leaves or old banana trash — but keep it about a hand-span (20 cm) clear of the stem, to hold moisture, keep the ground cool, and feed the soil as it rots.
- Do:
Handle the plant by the ball of soil, never the stem, keep the roots from drying, and plant in the cool of the morning or evening.
- Tip:
Planting too deep, or breaking the ball of soil off the roots — either one sets the young tree back badly.
- Watch out:
The first dry spell after planting — young cocoa has few roots and wilts fast. Water and re-mulch before it suffers.
Scout (black pod, capsids, CSSV) Recommended
In this first year the enemy that matters most is cocoa swollen shoot virus (CSSV) — it has no cure, and one infected tree left standing spreads it to the rest. A slow monthly walk lets you find and pull a sick tree before it takes down the orchard.
Once a month through the first year (starting about a month after planting out), walk the whole plot and look at the trees one by one.
Cocoa swollen shoot virus (CSSV): look for swollen, thickened stems and shoots, red streaks running along the veins of young leaves, and yellow blotchy mottling on the leaves. There is no cure — dig out and destroy any tree you suspect (this is called roguing), and take out a ring of its close neighbours too, as they are likely already infected.
Capsids (also called mirids — small sap-sucking bugs): look for dying-back shoot tips and dark, sunken spots on the young green stems where they have fed.
Mealybugs: tiny white, cottony specks clustered on shoots and in the branch forks, often with ants running among them. They carry the swollen shoot virus from tree to tree, so watch those trees closely and knock back the ant trails that farm them.
Black pod: on any early pods, watch for a hard brown-to-black patch that spreads until the whole pod goes black and the beans inside rot (much more on this once the trees are bearing).
- Tip:
Leaving a suspected virus tree standing 'to see what happens' — every week it stays, it seeds the next infections. When in doubt, take it out.
- Watch out:
Ant trails up the trunk — they shelter and move the mealybugs that spread the swollen shoot virus.
Weed + maintain moisture Recommended
A young cocoa tree cannot fight tall weeds for water and light, and it wilts fast when the ground dries. Keeping the ring around each tree weeded, mulched and moist through the first year is what turns a fragile seedling into an established tree.
Every month or so through the first year, clear the weeds from the ring around each young tree — about an arm's length out — so nothing competes with it for water.
Weed by hand, or hoe only shallowly near the tree — cocoa's feeding roots run just under the surface and are easily cut.
Top up the mulch as it rots down, keeping a thick layer around (but not touching) each stem to hold moisture and smother weeds.
In dry weather, water the young trees — they have few roots yet and dry out quickly. Keep the soil moist, never bone-dry and never swampy.
- Do:
Keep a thick mulch ring going all year — it does much of your weeding, watering and feeding for you.
- Tip:
Deep hoeing close to the stem — it slices the shallow feeder roots the young tree depends on.
Grow the frame to first flowering (years 1–3)
Over the next two to three years the tree builds its trunk and canopy and, near the end, sets its first flowers. Your job is to hold the conditions cocoa loves — light, broken shade (about a third-to-a-half open) and a moist floor of leaf litter — shape the young tree into a strong, open frame, and keep pulling out any virus trees before they spread.
Scout (black pod, capsids, CSSV) Critical
These building years are when swollen shoot virus and capsids can quietly take hold. The virus has no cure, so finding and pulling a sick tree early is the whole game — miss it and it runs straight down the row.
Every month through these building years (roughly years one to three after planting out), walk the plot and check each tree's trunk, shoots and leaves.
Cocoa swollen shoot virus (CSSV): swollen stems, red vein-banding on the new (flushing) leaves, and yellow leaf mottle. Dig out and burn any suspect tree — there is no cure — and take out the ring of trees around it too.
Capsids / mirids (sap-sucking bugs): dying-back shoot tips and dark, sunken patches on the green stems; a badly-hit tree looks scorched and stunted.
Mealybugs: white, cottony clusters on shoots and branch forks, tended by ants — they spread the virus, so watch those trees hardest.
Mark or note where you find each problem so you can follow it and act.
- Tip:
Sparing a swollen-shoot tree because it still looks half-alive — it is a virus factory. Remove it and the ring of trees around it.
- Watch out:
New flushes of soft, reddish young leaves — that is when the virus vein-banding shows clearest, so time a careful look to each flush.
Maintain ~30–40% shade + mulch/litter Recommended
Cocoa fruits best in light, broken shade with a moist carpet of leaf litter underfoot — and that litter is exactly where the tiny midges that pollinate your flowers breed. Too much shade starves the pods of energy; too little dries the midges out. Holding the middle is what makes the tree ready to bear well.
Thin the shade over the growing years toward about a third-to-a-half open — enough sun to feed the tree, enough shade to keep the air moist. Cut back or remove the temporary banana shade as the cocoa canopy fills in.
Keep a thick layer of leaf litter and mulch on the ground under the trees. Let fallen cocoa leaves and prunings lie, and add grass or banana trash.
Do not rake the plot bare — that damp litter is the breeding ground for the pollinating midges (tiny flies, smaller than a mosquito) you will depend on for every pod.
Keep the floor moist and shaded through dry spells.
- Do:
Leave prunings and fallen leaves lying as litter — a bare, swept floor kills off the midges and cuts your pod set.
- Watch out:
Shade creeping back into deep gloom — if the plot is dark and the trunks are bare and spindly, open the canopy up again.
Formative pruning for airflow Recommended
Shaping the young tree now — one strong frame, open in the middle — gives you a tree that is easy to reach, dries fast after rain (so far less pod rot), and puts its strength into pods rather than a tangle of useless wood.
In the first years after planting out, keep one strong, upright main stem and let the main branches form at a comfortable working height. Remove low, weak or crossing branches.
Cut off the chupons — the whippy upright shoots that spring from the trunk and base — unless you are keeping one to replace the main stem. They eat the tree's strength and give no pods.
Open the centre so light and air move through the canopy — an airy tree dries quickly after rain and rots far less.
Always cut out dead, broken or diseased wood and carry it right out of the plot.
Use a clean, sharp knife or saw and cut close without tearing the bark.
- Do:
Prune in a dry spell so the cuts dry and heal fast, and disease cannot enter the fresh wounds.
- Tip:
Cutting off the pod cushions — the woody bumps on the trunk and old branches where flowers and pods form. Damage them and you lose years of future pods.
- Watch out:
Chupons and water-shoots growing back — check every round and rub or cut them off while they are still small.
Flowering: help the midges set your pods
Once the tree is mature it flowers in flushes on the trunk and old branches (not on the leafy twigs). Each little flower must be pollinated by a tiny midge to become a pod — and only a small share ever set, so poor pollination is one of the biggest reasons cocoa yields stay low. There is nothing to spray here: the whole job is holding the moist, shady, litter-rich floor the midges breed in.
Maintain litter/mulch/humidity Critical
Your pods are set by tiny midges — little flies, smaller than a mosquito — that live and breed in damp leaf litter in the shade. Keep that floor moist and littered through flowering and the midges multiply and set your pods; rake it bare or let it dry out and the flowers open and fall for nothing.
Right through the flowering flush, keep a thick, damp carpet of leaf litter and mulch on the ground under the trees — this is the midges' breeding ground.
Hold the humidity up: keep the light, broken shade in place and the floor moist. In dry weather, mulch more and water if you can — dry air empties the plot of midges.
Add rotting organic matter near the trees to feed the midges — leaves, prunings, and husks from healthy pods (never from diseased ones).
Do not sweep or clean the plot bare during flowering.
- Tip:
Over-clearing shade and litter — it starves the pollinating midges and the pod-set drops.
- Do:
Pile healthy, disease-free leaf litter and pod husks under the trees — the rotting litter is exactly what the pollinating midges breed in.
- Watch out:
A hot, dry, windy spell during flowering — it dries the midges out and pod-set collapses. Water and mulch to keep the air moist.
Scout (poor set) Recommended
If lots of flowers open but few turn into pods, your midges are too few — and that is a yield loss you can actually fix, by improving the damp, shady, littered floor they breed in. Spotting poor set early gives the next flush a better chance.
Every week or so during flowering, look over the trunk and main branches: are the little flowers turning into small pods (about thumb-size), or just opening and dropping?
Some drop is normal — many tiny young pods (called cherelles) shrivel and blacken on their own. This cherelle wilt is the tree shedding what it cannot feed — not a disease.
But if hardly any flowers set pods, flush after flush, treat it as poor pollination: build up the litter, mulch, shade and humidity the midges need (see the litter task).
Keep the plot moist and littered, and watch whether the next flush sets better — that tells you it is working.
- Do:
Judge set over a whole flush, not over one day — cocoa always drops many flowers and tiny cherelles naturally.
- Watch out:
A swept, sun-baked, dried-out floor together with poor set — that pairing points straight at too few midges.
Pod development: beat black pod and feed for fill
The set pods now swell over about five to six months on the trunk and branches, and because the tree keeps flowering, pods of every age hang together. Two jobs decide this crop: stop black pod (the rot that can take a big share of your pods) by picking off and destroying sick pods every week, and feed potassium so the pods fill with heavy, well-formed beans.
Scout & sanitation (black pod) Critical
Black pod is cocoa's biggest pod-killer — a rot that jumps from pod to pod and can take a large share of your crop in a wet spell. Your strongest weapon is not spray, it is removing every rotten pod, every week, before it infects the pods around it.
Every week as the pods develop, walk the trees and look over the pods for black pod: a hard brown-to-black patch that starts small and spreads until the whole pod is black; inside, the beans are rotted and useless.
Cut off and carry away every diseased pod — the black ones, any just starting to spot, and any mummified (dried, shrivelled) pods still hanging. This sanitation (keeping the plot clear of sick pods) is the main control — one black pod left on the tree infects its neighbours.
Bury or heap the diseased pods well away from the trees — never drop them under the canopy, where the rot splashes back up onto healthy pods.
Keep the plot drained and airy — clear waterlogged spots and keep the canopy open (prune, and hold the moderate shade) so pods dry fast after rain, because black pod thrives in wet, still air.
In the wet season, back up your weekly clean-up with copper spray on a timed schedule (see the copper task).
- Do:
Do a black-pod round every week without fail in wet weather — skip a week and the rot jumps from a few pods to many.
- Tip:
Dropping diseased pods on the ground under the trees — the rot splashes straight back onto healthy pods. Carry them out.
- Watch out:
Long wet, cloudy spells with poor airflow — black pod explodes then. Tighten your weekly rounds and keep the canopy open.
Potassium feed Recommended
Filling pods pull huge amounts of potassium out of the tree — more than any other nutrient — and potassium is the one cocoa responds to most. Feed it while the pods fill and the beans come out plump and heavy; skimp and the pods stay small and the beans stay light.
Feed potassium while the pods are filling — your recommendation gives the exact amount and product for your trees and soil (don't guess the rate).
Spread it evenly on the ground under each tree's canopy — out toward the edge of the leaves (the drip line), where the feeding roots are — not piled against the trunk.
Apply onto moist ground (after rain or watering) so it dissolves down to the roots, and cover it with the leaf litter where you can.
Keep the mulch and litter in place — as it rots it releases potassium of its own, and it holds the moisture the roots need to take the feed up.
- Do:
Feed a little and often over the filling period rather than one big dose, and always spread it out under the canopy where the roots are.
- Tip:
Piling fertiliser against the trunk — it can burn the bark, and there are too few roots there to use it. Keep it out toward the canopy edge.
- Watch out:
Safety — wash your hands after handling fertiliser, keep it off food, water and children, and don't spread it onto wet leaves.
Copper fungicide (wet season) Recommended
In a wet season, picking off sick pods may not hold black pod on its own — copper spray coats the healthy pods and stops the rot getting in. It is your back-up to weekly sanitation, and it only earns its keep while the weather stays wet.
Spray copper fungicide during the wet season as a back-up to removing sick pods. Copper is a protectant — it coats the pod surface and blocks new infection, but cannot cure a pod already rotting — so it must go on before the rot arrives.
Start at the first black-pod spots, then repeat on a timed schedule — about every three to four weeks while the weather stays wet (your recommendation gives the product and amount).
Cover the pods well, especially on the trunk and lower branches, where black pod strikes first.
Keep spraying only while it is wet; once the rains ease and the pods dry fast, weekly sanitation alone will usually hold it.
Respect the pre-harvest interval — the waiting time on the label between spraying and picking — so no spray residue reaches the beans.
- Watch out:
Safety — cover your skin, eyes and nose, spray in the cool with the wind at your back and off any food, and wash yourself and the sprayer afterwards.
- Do:
Time copper to the first rot spots and the wet weather — spraying in a dry spell is wasted money.
- Tip:
Leaning on copper instead of sanitation — spray is only the back-up. Removing sick pods every week is the main control.
Pick ripe pods in rounds
Because the tree bears all year, pods ripen a few at a time, so you harvest in rounds every couple of weeks rather than all at once. Pick each pod only when it is truly ripe, and always cut it off — never pull — so you don't wreck the cushion that grows next year's flowers and pods.
Cut ripe pods Critical
A pod picked at the right ripeness gives the best, heaviest beans; picked green it is under-developed, left too long it can sprout inside or rot. And how you take it matters for years — tear off the cushion and you lose the very spot where future pods would have grown.
Check ripeness (this is what tells you it is time): the pod is fully coloured for its type — green pods turn yellow, red or purple pods turn orange — and when you tap it, it sounds hollow and the loose beans rattle faintly inside.
Go through the trees on a round every 2–3 weeks, taking the ripe pods and leaving the unripe ones to keep filling.
Cut each ripe pod off with a sharp knife (or a pruning hook on a pole for high ones) — snip the stalk cleanly, and never pull or twist the pod off.
Leave the pod cushion — the woody bump the pod grew from — undamaged; next season's flowers and pods come from that same spot.
Gather the picked pods and open and process them within a day or two (see the ferment-and-dry task).
If a pod fails the ripeness check → do this: if a pod you thought was ripe is green and pale inside, it wasn't ready — leave similar pods longer and judge by full colour plus the hollow rattle. If it is over-ripe (beans sprouting or discoloured inside), you are picking too late — shorten your rounds so pods don't hang past ripe.
- Do:
Cut ripe pods off with a knife — do not pull them (pulling damages the flower cushion for future pods).
- Tip:
Picking green, under-ripe pods — the beans are poor and ferment badly; and don't leave over-ripe pods hanging, as they may sprout or rot.
- Watch out:
High pods out of reach — use a pole hook and cut the stalk, rather than climbing and knocking off flowers and cushions.
Ferment and dry — this is where flavour and price are made
The beans come out of the pod wrapped in white pulp, tasting nothing like chocolate. Fermenting and then drying them is what creates the flavour buyers pay for — skip or rush it and even perfect beans fetch a poor price. Do it in the same rounds as picking, within a day or two of opening the pods.
Ferment 5–7 days + sun-dry Critical
Fermenting and drying is where cocoa's flavour — and your price — are actually made. Raw beans have no chocolate taste; the five to seven days of fermenting build it, and slow drying locks it in. Rush either step and even a heavy, healthy crop sells cheap or gets rejected.
Within a day or two of harvest, break the pods open (crack them with a wooden club, not a metal blade that cuts the beans) and scoop out the wet, pulp-covered beans. Throw out any black, flat or already-sprouted beans.
Ferment the beans for five to seven days — heaped on banana leaves, or in a wooden box with drain holes, covered with leaves or sacking to hold the heat. The pulp liquid drains away and the mass heats up.
Turn the beans every couple of days (say around day 2–3, then again) so they ferment evenly — this is what builds the chocolate flavour and turns the beans brown inside.
Then sun-dry the beans slowly on raised mats, racks or a clean tarpaulin — never on bare ground, which pushes damp back in and adds mould and dirt. Turn them often; take about one to two weeks depending on the sun, until they are dry to about 7% moisture — a well-dried bean is hard and snaps crisply, and a handful rustles.
Store the dried beans dry — in clean sacks, off the floor, away from damp and from strong smells (cocoa soaks up odours).
- Tip:
Skimping on fermentation — it gives poor flavour and a low price.
- Tip:
Storing damp beans — they grow mould and get downgraded or rejected.
- Do:
Turn the beans while they ferment and while they dry — even fermenting and even drying are what earn the top price.
- Watch out:
Drying too fast in fierce sun or over a fire — the outside hardens while the inside stays damp and moulds. Dry slowly and evenly.
Pests and diseases that attack cocoa


Grow cocoa with a plan, not a guess
This guide is the general answer. Divisi works out yours — the week to plant cocoa on your soil and your rainfall, and each job dated for your field.


When to plant cocoa, country by country
- When to plant cocoa in Angola
- When to plant cocoa in Benin
- When to plant cocoa in Botswana
- When to plant cocoa in Burkina Faso
- When to plant cocoa in Burundi
- When to plant cocoa in Cabo Verde
- When to plant cocoa in Cameroon
- When to plant cocoa in Comores
- When to plant cocoa in Congo
- When to plant cocoa in Côte d'Ivoire
- When to plant cocoa in Egypt
- When to plant cocoa in Eritrea
- When to plant cocoa in Ethiopia
- When to plant cocoa in Gabon
- When to plant cocoa in Gambia
- When to plant cocoa in Ghana
- When to plant cocoa in Guinea Ecuatorial
- When to plant cocoa in Guinea-Bissau
- When to plant cocoa in Guinée
- When to plant cocoa in Kenya
- When to plant cocoa in Liberia
- When to plant cocoa in Madagascar
- When to plant cocoa in Malawi
- When to plant cocoa in Mali
- When to plant cocoa in Mauritanie
- When to plant cocoa in Mauritius
- When to plant cocoa in Moçambique
- When to plant cocoa in Namibia
- When to plant cocoa in Niger
- When to plant cocoa in Nigeria
- When to plant cocoa in Rwanda
- When to plant cocoa in République centrafricaine
- When to plant cocoa in République démocratique du Congo
- When to plant cocoa in Sao Tome and Principe
- When to plant cocoa in Seychelles
- When to plant cocoa in Sierra Leone
- When to plant cocoa in Somalia
- When to plant cocoa in South Sudan
- When to plant cocoa in Sudan
- When to plant cocoa in Sénégal
- When to plant cocoa in Tchad
- When to plant cocoa in Togo
- When to plant cocoa in Uganda
- When to plant cocoa in United Republic of Tanzania
- When to plant cocoa in Zambia
- When to plant cocoa in Zimbabwe
Where cocoa scores best
Districts where Divisi's engine currently rates this crop highest, ranked by fit.
-
 Mbini
Mbini -
 Brazzaville
 -
 Dugbe River
 -
 Basse-Banio
 -
 Lupatapata
 -
 Chitato (Lóvua)
 -
 Bukoba Urban
 -
 North Mahe
 -
 Suna East
 -
 Micomeseng
 -
 Bolloh
 -
 Divenie
Get Insights by email
A short digest of new Divisi articles. No email on quiet weeks.
Frequently asked questions
How do I grow cocoa?
How to grow cocoa: 150–180 days to maturity, 300 cm rows. Also called cacao, cacaoyer, cacau, kakao.
What is cacao in English?
Cacao (also cacaoyer) is the French name for cocoa.
What is cacau in English?
Cacau is the Portuguese name for cocoa.
What is kakao in English?
Kakao is the Swahili name for cocoa.
How long does cocoa take to grow?
Cocoa takes about 150–180 days from sowing to maturity, though the exact length varies with variety, temperature and how the season runs.
What spacing should I use for cocoa?
Space cocoa rows about 300 cm apart, with roughly 300 cm between plants within the row.
What pests and diseases attack cocoa?
The ones covered in this guide are Black pod, Capsids (mirid bugs), Cocoa swollen shoot virus. Each has its own page explaining how to identify, check for and control it.