 Divisi
How to grow cassava
Manihot esculenta · Euphorbiaceae
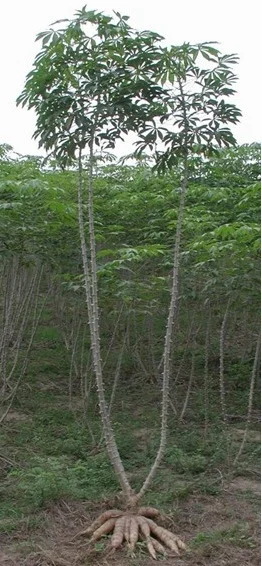
Photo: Picho Ceballos · CC0
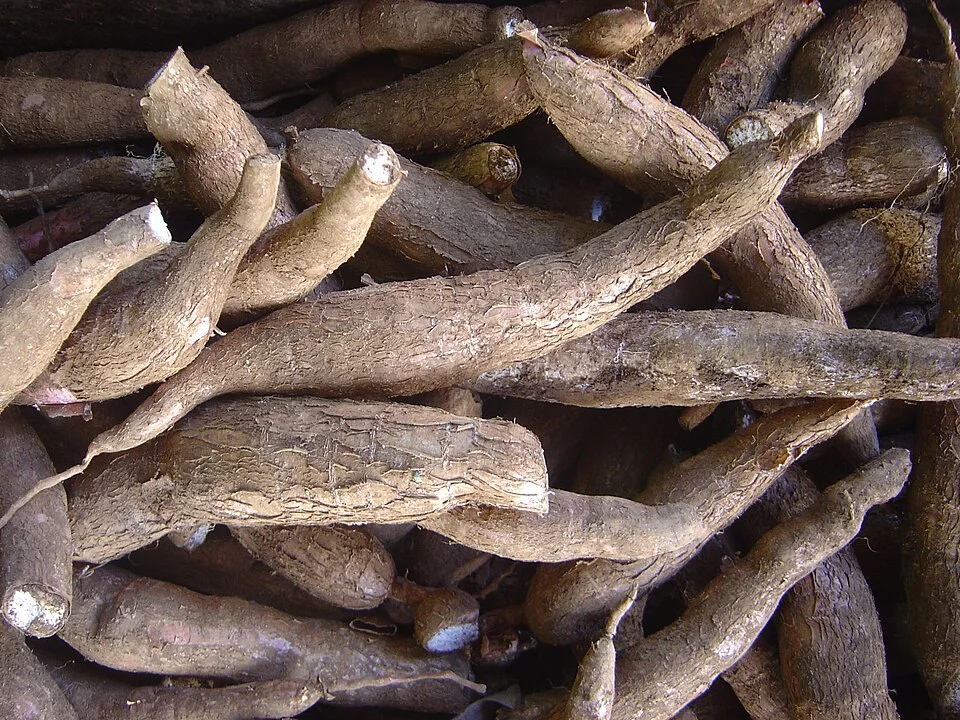
Cassava is a hardy, woody shrub grown for its fat, starchy roots — a food that grows where little else will. Unlike most crops, you plant it not from seed but from cut pieces of stem (cuttings, or 'stakes'), so every plant is a copy of its mother — which is why choosing healthy, disease-free stems is the single most important thing you do all season. Cassava shrugs off drought and poor soil, and its roots can be left in the ground for months and dug as you need them, like a living store. It comes in sweet and bitter types: sweet cassava is safe with normal cooking, but bitter cassava carries much more natural cyanide (a poison) and must be fully processed — peeled, grated, soaked and dried — before it is safe to eat.
David Monniaux · CC BY-SA 3.0 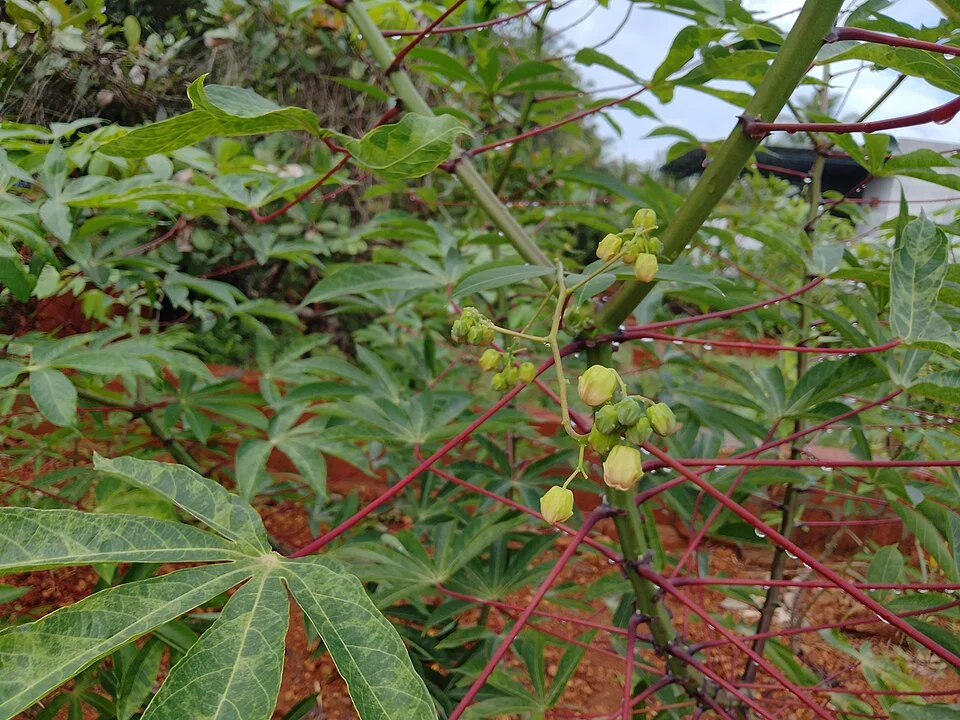
Vijayanrajapuram · CC BY-SA 4.0
- Days to maturity
- 240–730 days
- Row spacing
- 100 cm
- Plant spacing in the row
- 100 cm
- Sowing depth
- 5–10 cm
These are general figures for the crop, compiled from published agronomic references including FAO and CABI. The right choice for your field depends on your soil, rainfall and the yield you are aiming for.
Will cassava actually do well on your field? Check your own field against every crop in the catalogue — no signup. Run the crop check →
Also known as
Cassava is also called manioc and yuca.
- English
- manioc, yuca
- Afrikaans
- maniok
- Chichewa
- chinangwa
- French
- manioc
- Igbo
- gbaguda
- Portuguese
- mandioca
- Shona
- mufarinya, mfarinya
- Swahili
- muhogo
- Yoruba
- ege
Working in buckets, bags or paces? The farming glossary turns the measures growers actually use into kilograms and hectares — what a 20 litre bucket of each crop really weighs, and how to size a field by walking it — alongside the Shona, Swahili, Ndebele and Yoruba words used in the field. Open the glossary →
Growing cassava, stage by stage
Your cassava crop from clean stems to safe food — choose healthy cuttings, plant and root them, keep the young crop weed-free and virus-free, then lift and process the roots before they spoil.
Pick your field and your planting stems
With cassava, your whole crop is only as healthy as the stems you plant — because cassava grows from cut pieces of stem, not from seed, any disease in the mother plant travels inside the cutting into your field. So the biggest decisions of the season are made now: choose light, well-drained soil, and take your planting stems only from strong, healthy plants with no sign of mosaic or brown-streak disease. Get this right and the rest of the season is far easier.
Choose a well-drained, sunny, light-soil field Recommended
Cassava is tough and grows where other crops fail, but it has two enemies in the soil: standing water rots the roots, and heavy or salty land gives you thin, forked roots that are hard to lift. A sunny, sandy, free-draining field lets the roots swell fat and clean.
Pick a field that gets full sun all day — cassava is a sun-lover and grows thin and weak in shade.
Choose light, sandy or sandy-loam soil that water drains through quickly — cassava makes the best roots in loose soil it can push into.
Avoid low, wet spots where water sits after rain — waterlogged soil rots the roots and invites root rot.
Avoid heavy clay, hardpan, stony or salty land — the roots come out small, forked and hard to lift.
If your only land is a bit heavy or wet, plan to plant on ridges or mounds (see the ridging task) to lift the roots above the wet.
- Tip:
Taking cuttings from a field where plants show yellow, mottled or twisted leaves, or brown streaks on the stems — those are the virus diseases cassava mosaic disease (CMD) and cassava brown-streak disease (CBSD), and they ride inside the cutting straight into your new field.
- Do:
Walk the field a few hours after a heavy rain — if water is still standing, it is too wet for cassava unless you plant on ridges.
- Watch out:
A spot that grew a healthy sweet-potato, groundnut or cassava crop last year is usually good, light land for cassava — but rotate where you can: planting cassava on the same land year after year lets green mite and mealybug build up, so following a different crop is better than cassava-on-cassava.
Select clean, disease-free planting stems Critical
This is the single most important choice of the whole season. Cassava carries its diseases inside the stem, so a cutting from a sick plant plants the disease with it — and mosaic (CMD) or brown-streak (CBSD) can each cut your harvest by half or wipe it out. Clean stems from strong plants are free protection you cannot buy back later.
Choose your mother plants before you cut — walk a healthy, vigorous stand and mark plants with dark-green, normal-shaped leaves and no mottling, yellow patterns, twisting or brown stem streaks.
Use resistant or certified clean planting material if you can get it — it is the best possible start against CMD and CBSD.
Take the middle, mature part of the stem — the older brown, woody wood, not the soft green tip and not the very hard old base. Stems from plants 8–18 months old are best.
Pick stems at least as thick as your thumb (2 cm or more) — fat stems store more food to push out strong sprouts and roots.
Handle stems gently and keep them in the shade — don't strip the bark or let them dry out in the sun.
Where bacterial blight or mealybug is a problem, dip the stems in hot water (about 50 °C — hot, but you can still dip a finger in for a moment) for about 50 minutes before planting to kill pests and germs riding on the stem.
- Do:
Cut stems fresh, close to planting day — a stem that has dried out for many days sprouts poorly or not at all.
- Tip:
Using the soft green tip or the tough old base of the stem — the tip rots and the old base sprouts weakly. The brown middle is the part to plant.
- Watch out:
A plant that looks fine but stood among mosaic-sick plants may already be infected — always take stems from the healthiest block, never near sick plants.
Ridge or mound (wetter/heavier land) Recommended
Cassava roots rot and stay small in wet, heavy soil. Planting on a ridge or mound lifts the roots into loose, drained soil where they can swell fat — and makes them far easier to lift at harvest.
Do this on heavier or wetter land — on light, sandy, free-draining soil you can simply plant on the flat.
Loosen the soil first to about a hoe-blade deep (15–20 cm) so the roots can push down.
Build ridges or round mounds about a hand-span high (15–20 cm) — high enough to keep the roots above where water sits.
On a slope, run the ridges across the slope, not up-and-down, so they catch the rain and slow the soil from washing away.
- Do:
Make the mounds bigger in the wettest spots — the more water the land holds, the higher you lift the roots.
- Watch out:
Loose, ridged soil also dries out faster — in a dry spell, mulch between the ridges to hold moisture.
Apply basal fertiliser / well-rotted manure Recommended
Cassava grows on poor soil, but to make fat roots it pulls a lot of potassium (K) out of the ground. A little well-rotted manure or the right basal (a fertiliser worked into the soil before planting) now feeds the soil steadily and helps the roots bulk — while too much nitrogen would only grow leaves and starve the roots.
Remember cassava is not a hungry crop for nitrogen — it needs mostly potassium (K) to fill the roots. Don't pour on nitrogen fertiliser; it grows big tops and small roots.
Spread well-rotted manure or compost — dark, crumbly, no strong smell — evenly across the whole field and work it in. If you place it by the planting spot instead, use only a small handful per hole — don't move the whole field's dose into the holes, or it over-concentrates and burns the young cutting. (Fresh, un-rotted manure burns it too, and brings weed seeds.)
If you use a bought basal, choose one that carries potassium — your recommendation gives the type and amount for your field.
Work it into the topsoil before you plant, so it is ready where the young roots will grow.
- Do:
Save your best manure for the poorer, sandier fields — that is where it helps cassava most.
- Tip:
Heavy nitrogen fertiliser — it grows a big leafy bush and leaves you with fewer, smaller roots, which is the opposite of what you want.
- Watch out:
Wash your hands after handling manure or fertiliser, and keep both off food and water and away from children.
Plant the cuttings and get a full stand
Now you plant the stems and get them to root and sprout — this takes about 1–2 weeks. The number of healthy sprouts you get is the number of plants you'll harvest, so aim for a full, even stand. This is also the one stage where cassava truly needs moisture — the fresh cutting has no roots of its own yet. Watch for gaps, pull out any sickly sprout at once, and gap-fill quickly while there's still time.
Plant cuttings + basal Critical
The way you set each cutting decides whether it roots strongly and how easy the roots are to lift later. Right length, depth, buds-up and spacing give an even, full stand — and the number of plants you establish now is the ceiling on your whole harvest.
Cut each stem into stakes about as long as your forearm (20–25 cm), each with 5–7 buds (nodes) — the little bumps that sprouts grow from. Cut straight across, and don't split or crush the wood.
Know which way is up: the buds and leaf-scars point upward on the growing plant. Plant the stake the same way up — an upside-down stake sprouts poorly or not at all.
In normal soil, push the stake in upright or at a slight lean (about 45°), with two-thirds buried and a third above ground, buds pointing up.
In hot, dry areas, lay the stake flat and cover it about a hand's width deep (5–10 cm) — buried this way it stays moist and roots along its whole length.
Space plants one long stride apart each way (about 1 m × 1 m) — cut a stick to 1 m as a measuring guide. This gives about 10,000 plants per hectare.
On wet or heavy land, plant on the ridges or mounds you made. Firm the soil around each stake so it stands and grips well.
- Do:
Plant at the start of the rains, into moist soil — the cutting needs steady moisture to grow roots before any dry spell hits.
- Tip:
Planting the stake upside-down — check the buds point up every time; an upside-down stake wastes the whole station.
- Watch out:
Push the stake in gently, or loosen the spot first — forcing a stake into hard soil strips the bark and kills the buds.
Scout (sprouting, termites, gaps) Critical
The first few weeks decide your stand. Termites eat the buried stakes, some stakes simply fail to root, and you can only fix gaps if you catch them early. A short walk each week now protects the number of plants you'll harvest.
Once a week, walk right across the field in a big 'W' so you cover the corners and the middle — not just the edge by the path.
Check that stakes are sprouting — green shoots pushing from the buds. By 1–2 weeks most should show; mark any that are still bare.
Gently wiggle a few bare stakes. If one pulls out hollowed, soft or eaten inside, that is termites — common in dry, sandy fields and on stakes that dried out.
Look for gaps — stations where the stake has rotted, dried or been eaten and nothing is coming — and count them, so you know whether to gap-fill.
Glance at the first leaves for yellow mottling or twisting (CMD) — pull out any clearly sick sprout straight away so it can't seed disease into the field.
- Watch out:
Termites go for stressed, dried-out stakes first — fresh, healthy stakes planted into moist soil are far less likely to be eaten.
- Do:
Check especially after a hot, dry spell — that is when termite loss and stake die-off climb.
Check sprouting Critical
A thin or patchy stand caps your yield — but you can still fill gaps now, in the first few weeks, and not later. Counting the sprouts at 2–3 weeks tells you in time whether you need to replant the gaps.
About 2–3 weeks after planting, walk the rows and count how many stakes have sprouted against how many you planted.
Work out the share that came up — for example, 90 sprouted out of 100 planted = 90%.
90 or more in every 100 (90%+) → a good stand, carry on.
If it fails — fewer than 90 in 100 sprouted → gap-fill the empty stations in the next few days with fresh, healthy stakes (see the gap-fill task), while there is still time for them to catch up.
- Do:
Count at the same time you scout, so it's one trip, not two.
- Watch out:
A whole patch of bare stakes usually means termites or stakes that dried out — check the cause before you just replant the same way.
Gap-fill dead stakes Critical
Every empty station is a plant's worth of roots gone. Slotting a fresh stake into each gap now — while the crop is only a few weeks old — recovers those plants before the rest grow too big for a late-comer to catch up.
Go to each gap — a station where the stake rotted, dried or was eaten and nothing has sprouted.
Pull out the old dead stake so the new one has clean soil to root into.
Plant a fresh, healthy stake the same way as before — right way up, two-thirds buried, taken from a clean mother plant.
Do it within the first 3 weeks, and water the new stakes in if the soil is dry — stakes planted much later sit in the shade of the older plants and never make a proper root.
- Do:
Cut and keep a bundle of spare stakes in the shade at planting time, so you always have clean material ready to gap-fill.
- Tip:
Leaving gaps to 'catch up on their own' — a stake planted weeks late is shaded out by its neighbours and barely roots.
Irrigate Recommended
A fresh cutting has no roots yet — it lives on the water in the soil around it until it grows its own. This is the one stage cassava really needs steady moisture; dry soil now means stakes that never root and a patchy stand.
Keep the soil around the stakes moist but not waterlogged through the first few weeks while they root.
If there is no rain, water about once a week — more often on hot days and on fast-draining sandy soil.
Check with a finger: water when the top few centimetres are dry.
Once the plants are well sprouted and rooted, ease off — established cassava is very drought-hardy and needs little extra water.
- Tip:
Flooding or waterlogging the field — the buried stake rots in standing water just as surely as it dries out in drought.
- Do:
If you can water at only one time in the whole season, water now, during rooting — after this, cassava mostly looks after itself.
Build the canopy and keep it clean
Now the plant builds its stems and leaves and closes the ground over with a canopy. Two jobs matter most: keep the field weed-free through the first 8–12 weeks — when weeds do the most damage — and pull out any virus-sick plant the moment you see it. Don't reach for broad insecticides: cassava has natural helper insects that keep mites and mealybug in check, and a broad spray kills them too.
Scout (CMD/CBSD, green mite, mealybug) Critical
This is your main window to catch trouble early. Mosaic (CMD) and brown-streak (CBSD) show clearly now and must be pulled before whitefly spread them; green mite and mealybug flare in the dry season. Spotting them early — and protecting the helper insects — keeps the leaf-factory that fills your roots working.
Every 1–2 weeks, walk the field in a big 'W' and look closely at the young top leaves across the field — that is where trouble shows first.
Mosaic (CMD): yellow-and-green mottled, patchy, twisted or shrunken leaves. Mark the plant to rogue (pull) it.
Brown-streak (CBSD): yellow blotches along the veins and brown streaks on the green stems. The real damage is a brown rot inside the roots you can't yet see, so never ignore it.
Whitefly: tiny white flies on the undersides of the young top leaves that fly up in a little white cloud when you shake the plant — these are what carry mosaic and brown-streak from sick plants to healthy ones, so the more you see, the faster you must rogue any sick plant.
Green mite: fine yellow speckling and tight, bunched 'candlestick' tips on the growing point — worst in the dry season.
Mealybug: white, cottony clusters on the tips and leaves, with bunched, stunted growth.
Bacterial blight: angular dark, water-soaked leaf spots, wilting tips and gum oozing on the stems — often after heavy rain.
Rogue every virus-sick plant on sight, and leave the helper insects alone — a tiny wasp and predator mites quietly control mealybug and green mite for free.
- Tip:
Broad-spectrum insecticide — it kills the helper wasp (Anagyrus lopezi) and the predatory mites that control mealybug and green mite for you at no cost.
- Tip:
Weeding late — the crop must be weed-free through the first 8–12 weeks; weeds left now can cut your root yield by up to 80%.
- Watch out:
Light green-mite speckling or a little mealybug in the dry season often clears on its own once the helper insects and the rains arrive — don't panic-spray and kill your own protection.
Weeding (critical) Critical
Young cassava grows slowly at first and can't shade out weeds, so for the first 8–12 weeks weeds steal its water, light and food. This is the costliest weakness in the whole crop — weeds left now can cut your root yield by anywhere from a fifth to four-fifths (20–80%).
Start weeding early — by about 3 weeks after planting, before the weeds get bigger than the young cassava.
Weed again every few weeks to keep the field clean right through the first 8–12 weeks (about 2–3 months) — the make-or-break weed-free window.
Hoe shallow near the plants — cassava's feeding roots and the swelling storage roots sit close to the surface, and deep hoeing cuts them.
Once the canopy closes and shades the ground, the plants smother most weeds themselves and you can ease off.
- Do:
Weed while weeds are still small — a clean field in the first 2–3 months is the cheapest yield you will ever gain.
- Tip:
Deep, close hoeing — wounding the young storage roots stunts them and lets in root rot.
- Watch out:
In dry areas, leave the pulled weeds lying between the rows as a mulch to hold moisture.
Rogue virus plants Critical
A virus-sick plant will never make a proper root, and it is a store of disease that whitefly carry to your healthy plants. Pulling it out ('roguing') stops the spread and is — after clean stems — the main way to keep CMD and CBSD out of your field.
As you scout, mark any plant with mosaic mottling (CMD) or brown stem streaks (CBSD) — these viruses don't heal and no spray cures them.
Uproot the whole plant, roots and all, as soon as you spot it — the earlier the better, before whitefly spread it further.
Carry it out of the field and burn it, bury it or feed the stems to animals — never leave it lying in or beside the crop, and never take cuttings from it.
Fill the gap it leaves only if the crop is still young; late in the season, just let the canopy close over the space.
- Do:
Rogue on sight, every time you walk the field — one sick plant left standing seeds many more through whitefly.
- Tip:
Ever saving stems from a rogued plant for planting — the whole point is to break the disease chain, not carry it forward.
- Watch out:
Lots of new mosaic plants appearing means whitefly are busy — check that you started with clean stems, and consider a more resistant variety next season.
Top-dress fertiliser (esp. K) Recommended
As the plant starts building toward root-filling, potassium (K) is the nutrient that matters most for cassava — it is what packs starch into fat roots. A K top-dressing now, banded beside the plants, feeds that root growth. (Piling on nitrogen here just grows more leaves.)
Use a fertiliser that carries potassium (K) — the nutrient cassava needs most. Your recommendation gives the type and amount for your field and soil, and may include a little zinc, which cassava also responds to on poor, sandy land.
Band it in a line about a hand's width to the side of the plants, not touching the stems, and cover it with soil so it doesn't wash or blow away.
Apply on moist soil — after a weeding or a light rain — so it dissolves down to the roots.
Go easy on nitrogen — a little is fine, but heavy nitrogen grows a big leafy bush and fewer, smaller roots.
- Do:
Weed first, then feed — so the fertiliser goes to the cassava, not the weeds.
- Tip:
Letting fertiliser touch the stems or sit on wet leaves — it scorches them; keep it banded to the side and covered.
- Watch out:
Wash your hands after handling fertiliser, and keep it off food and water and away from children.
Bulk the roots
The canopy is closed and the plant now pumps starch down into the storage roots — this is where your yield is actually made, and where the plant's hunger for potassium peaks. There is little to do now but watch: the crop mostly looks after itself, so keep an eye out for mites and mealybug in dry spells, root rot in wet ground, and spot-weed only where weeds break through.
Scout (green mite, mealybug, late CBSD) Recommended
The roots are filling now, so the crop mostly looks after itself — but green mite and mealybug flare in the dry season and can strip the leaves that feed the roots, and root rot creeps in where the soil stays wet. A fortnightly look lets you act before they cost you roots.
Every 2 weeks or so, walk the field and check the growing tips and leaves — you are mainly watching, not working, now.
Green mite / mealybug: in dry spells, look for yellow speckling, bunched 'candlestick' tips and white cottony clusters near the top. Leave the helper insects to deal with light attacks.
Late brown-streak (CBSD): yellowing along the veins and brown streaks on the stems — mark and rogue, because the hidden root rot forms in these last months.
Root rot: in low, wet patches, watch for plants that suddenly wilt or yellow and stems that loosen — a sign the roots are rotting in waterlogged soil.
Scrape a little soil from a stem base now and then to feel a root — it tells you how bulking is coming along and when maturity is near.
- Tip:
Broad insecticides even now — the helper wasp and predator mites remain your cheapest, best protection against mealybug and green mite.
- Watch out:
Sudden wilting in a wet patch is usually root rot from waterlogging — improve the drainage there, and don't leave those roots long in the ground.
Spot-weed Optional
Once the canopy shades the ground, most weeds give up — so this is light work. But a few tough weeds can still push through gaps, and if you let them seed, they make next season's weeding much harder.
Walk the field about once a month and simply pull or slash the few weeds that break through the canopy — mostly along the edges and in any thin spots.
Hoe shallow or hand-pull near the plants so you don't wound the swelling roots just under the surface.
Pull weeds before they set seed — stopping seed now saves you far more work next season.
- Do:
Keep it light — under a closed cassava canopy this is a quick walk-through, not a full weeding.
- Tip:
Disturbing the soil deeply around the roots this late — you only risk wounding roots for very little gain.
The roots reach maturity
Cassava doesn't ripen on a fixed day like grain — the roots are ready anywhere from about 8 months (sweet, fresh-eating types) to 12–18 months or more (bitter, industrial types). The best part is that the roots can be left in the ground and lifted as you need them, like a living store. But don't leave them too long: very old roots turn woody, and in wet soil they are more likely to rot. Watch for the plant's own maturity signs — lower leaves yellowing and dropping, the soil cracking and heaving at the stem base, and fat, firm roots on a test-lift — then harvest as you need.
Harvest — lift the roots by hand
Harvesting cassava is the heaviest job of the season — you loosen the soil and lift the whole plant out by its stem base. Work carefully: bruised or broken roots spoil within a day or two, so gentle lifting is the difference between roots that keep and roots that rot. Lift only what you can process or sell in the next couple of days, and save your best stems for next season as you go.
Hand-lift the roots Critical
This is where you collect the whole year's work. Roots snap easily and any wound starts the clock on spoilage — a broken root can go bad within a day. Lifting gently, in softened soil, brings the roots up whole, so they keep long enough to process or sell.
Harvest when the plant shows it is ready — lower leaves yellow and drop, the soil cracks and heaves around the stem base, and a test-lift of one plant shows fat, firm roots.
About 2–3 weeks before you lift, cut the tops off at roughly knee height — this hardens the roots, slows how fast they spoil after harvest, and gives you clean stems to save.
Loosen the soil all around the plant first with a hoe or fork, especially in dry, hard ground — never just yank the plant out.
Grip the plant low, at the stem base, and rock it gently to ease the whole root bundle out in one piece.
Handle the roots like eggs — don't bruise, cut or break them; wounds turn the flesh bad fast. Lay them gently in the shade, not thrown in a heap in the sun.
Lift only what you can process or sell within 1–2 days — the rest keeps best left in the ground until you need it.
- Do:
Cut the tops off about 2–3 weeks before lifting — it hardens the roots and slows how fast they spoil, and gives you the stems to save for planting.
- Do:
Harvest in the cool of the morning or evening and keep the lifted roots in the shade — heat speeds up spoilage.
- Tip:
Lifting in hard, dry soil without loosening it first — you will snap the roots off in the ground and lose them.
Save the best disease-free stems Recommended
Your next crop starts here. The stems you keep now are next season's seed — and because disease travels inside the stem, saving only clean stems from your best plants gives your next crop a healthy, free start.
As you harvest, pick stems from your healthiest, best-yielding plants — good roots and clean leaves, with no mosaic mottling or brown streaks.
Keep the mature, brown woody middle of the stem; you can leave them long (whole stems) and cut them into stakes only at planting time.
Bundle them and stand them upright in a cool, shady spot, base down, out of the sun — standing stems stay alive and fresh far longer than stems lying in a heap.
Use the saved stems within a few weeks to a couple of months — the fresher the stem, the stronger it sprouts. Keep them off the sun and off wet ground.
- Do:
Mark or set aside your best mother plants before harvest, so you know exactly which stems to save.
- Tip:
Saving stems from sick or poor plants just because they are handy — you would be planting disease and low yield into next season.
- Watch out:
Don't let saved stems dry out, chill in a cold snap, or bake in the sun — a dried or damaged stem sprouts weakly or not at all.
Process fast — and make it safe to eat
Cassava roots don't keep — they start to spoil within 1–3 days of lifting, going bad from the inside. So process them within a day or two, or leave the rest in the ground and lift as you need it. Just as important: cassava roots carry natural cyanide (a poison), and bitter types carry a lot. Sweet types are safe with normal cooking, but bitter cassava must be fully processed — peeled, grated, soaked and dried — or it can poison your family. This step is about food that is both saved and safe.
Process the roots (peel, grate, soak/ferment, dry) Critical
Two things are at stake: not losing the crop, and not poisoning anyone. Roots go bad fast, so speed saves the harvest. And cassava's built-in cyanide must be removed from bitter types — get it right and you have safe flour, gari or fufu that stores for months; get it wrong and bitter cassava can cause poisoning and a crippling disease called konzo.
Know your type first. Sweet cassava (low cyanide) is safe with normal peeling and thorough cooking. Bitter cassava (high cyanide) must go through every step below — never eat it just boiled.
Peel the roots — the skin and the layer just under it hold most of the cyanide, so take it right off.
Grate or pound the peeled root. Breaking the flesh open lets the plant's own enzyme reach and break down the poison — whole chunks trap it inside.
Soak and/or ferment the mash in water for 2–5 days, and/or press out the liquid — the cyanide dissolves into the water and escapes into the air. Pour the soaking water away safely, well away from people and animals.
Dry it slowly in the sun (and/or roast, as for gari) until hard and dry, then pound into flour or make gari/fufu — drying and cooking finish off the last of the cyanide.
Do all this within 1–2 days of lifting — spoiled roots are wasted roots. Sweet types you will eat soon can simply be peeled and cooked well.
- Watch out:
Cut a root open — blue-black or brown streaks inside mean it is spoiling. Roots streak within 1–2 days and are usually spoiled by about 3 days, so process within a day or two, or leave them in the ground.
- Tip:
Short-cut boiling of bitter cassava — quick boiling can stop the enzyme before the cyanide is gone. Bitter types must be fully processed (peel, grate, soak, dry), not just boiled.
- Do:
If a batch still tastes very bitter after cooking, don't eat it — soak, ferment and dry it longer; strong bitterness means cyanide is still there.
- Watch out:
Never let children eat under-processed bitter cassava or drink the soaking water — the poison harms children and pregnant mothers most.
Pests and diseases that attack cassava
-
 Anthracnose
 -
 Bacterial blight
 -
 Bagworms
 -
 Cassava bacterial blight
 -
 Cassava brown streak disease
 -
 Cassava green mite
 -
 Cassava mealybug
 -
 Cassava mosaic disease
 -
 Larger grain borer
 -
 Mealybugs
 -
 Papaya mealybug
 -
 Red spider mite
 -
 Scale insects
 -
 Termites
 -
 Tuber rots
 -
 Whitefly
Where to sell cassava
Markets that trade this crop — what each one sells it by, when supply peaks there, and the currency used.
-
 Grand Marché de Kinshasa
-
 Kariakoo Market
-
 Kongowea Market
-
 Konkomba Yam Market
-
 Marché Gouro d'Adjamé
-
 Marché Mokolo
-
 Mercado Treinta
-
 Onitsha Main Market
Grow cassava with a plan, not a guess
This guide is the general answer. Divisi works out yours — the week to plant cassava on your soil and your rainfall, and each job dated for your field.


When to plant cassava, country by country
- When to plant cassava in Algeria
- When to plant cassava in Angola
- When to plant cassava in Benin
- When to plant cassava in Botswana
- When to plant cassava in Burkina Faso
- When to plant cassava in Burundi
- When to plant cassava in Cabo Verde
- When to plant cassava in Cameroon
- When to plant cassava in Comores
- When to plant cassava in Congo
- When to plant cassava in Côte d'Ivoire
- When to plant cassava in Egypt
- When to plant cassava in Eritrea
- When to plant cassava in Eswatini
- When to plant cassava in Ethiopia
- When to plant cassava in Gabon
- When to plant cassava in Gambia
- When to plant cassava in Ghana
- When to plant cassava in Guinea Ecuatorial
- When to plant cassava in Guinea-Bissau
- When to plant cassava in Guinée
- When to plant cassava in Kenya
- When to plant cassava in Liberia
- When to plant cassava in Madagascar
- When to plant cassava in Malawi
- When to plant cassava in Mali
- When to plant cassava in Mauritanie
- When to plant cassava in Mauritius
- When to plant cassava in Moçambique
- When to plant cassava in Namibia
- When to plant cassava in Niger
- When to plant cassava in Nigeria
- When to plant cassava in Rwanda
- When to plant cassava in République centrafricaine
- When to plant cassava in République démocratique du Congo
- When to plant cassava in Sao Tome and Principe
- When to plant cassava in Seychelles
- When to plant cassava in Sierra Leone
- When to plant cassava in Somalia
- When to plant cassava in South Africa
- When to plant cassava in South Sudan
- When to plant cassava in Sudan
- When to plant cassava in Sénégal
- When to plant cassava in Tchad
- When to plant cassava in Togo
- When to plant cassava in Uganda
- When to plant cassava in United Republic of Tanzania
- When to plant cassava in Zambia
- When to plant cassava in Zimbabwe
Where cassava scores best
Districts where Divisi's engine currently rates this crop highest, ranked by fit.


Get Insights by email
A short digest of new Divisi articles. No email on quiet weeks.
Frequently asked questions
How do I grow cassava?
How to grow cassava: 240–730 days to maturity, 100 cm rows, 5–10 cm deep. Also called manioc, maniok, chinangwa, gbaguda, mandioca, mufarinya, muhogo, ege.
What is maniok in English?
Maniok is the Afrikaans name for cassava.
What is chinangwa in English?
Chinangwa is the Chichewa name for cassava.
What is manioc in English?
Manioc is the French name for cassava.
What is gbaguda in English?
Gbaguda is the Igbo name for cassava.
What is mandioca in English?
Mandioca is the Portuguese name for cassava.
What is mufarinya in English?
Mufarinya (also mfarinya) is the Shona name for cassava.
What is muhogo in English?
Muhogo is the Swahili name for cassava.
What is ege in English?
Ege is the Yoruba name for cassava.
How long does cassava take to grow?
Cassava takes about 240–730 days from sowing to maturity, though the exact length varies with variety, temperature and how the season runs.
What spacing should I use for cassava?
Space cassava rows about 100 cm apart, with roughly 100 cm between plants within the row.
How deep should cassava be planted?
Sow cassava at about 5–10 cm deep. Shallower risks drying out; deeper wastes seed energy before the shoot reaches light.
What pests and diseases attack cassava?
The ones covered in this guide are Anthracnose, Bacterial blight, Bagworms. Each has its own page explaining how to identify, check for and control it.